Other pages
Complimentary Science Software License
End User License Agreement
Scope of this Software License Agreement:
This is the SPHIRE-crYOLO Complimentary Science Software License Agreement, which applies to all software products available for download from the SPHIRE-crYOLO website(s), unless labeled as something other than complimentary.
The licensed Software / Product:
Short description of the software:
We present an automatic particle picking procedure for single particle electron cryomicroscopy (cryo-EM) called crYOLO, which is based on the well-known deep learning object detection system “You Only Look Once” (YOLO). We used three cryo-EM datasets from the EMPIAR databank to test crYOLO. After training crYOLO with not more than 2,500 particles per dataset, it selected the particles with high precision and accuracy. Irregularly-shaped particles are also well centered during selection and, in addition, the YOLO approach allows crYOLO to account for the context of the particle. Using standard NVIDIA GPUs, crYOLO picks up to 6 micrographs per seconds. The quality of crYOLO particle selection significantly speeds up processing and may even improve the achieved resolution. Furthermore, we showed that trained by multiple datasets is generalizes and picks previously unseen datasets.
For further description see the http://sphire.mpg.de
The following components of the software are provided as source code or in compiled form:
crYOLO software for training and automated particle selection
Pretrained weights for the generalizing model
Intellectual Property:
All software available for download via the SPHIRE-crYOLO website(s) are copyright Max-Planck-Society e.V. (Institute of Molecular Physiology, Group Raunser, Thorsten Wagner) unless otherwise stated. Copyright law protects this software and any associated material. Max-Planck-Society e.V. retains title to and ownership in the copyright of the software program and the associated materials. This software is not provided as public domain software.
Complimentary Science Software License Rights:
The Software is licensed for non-commercial academic and research purposes only. All software products available for download from associated website(s), unless labeled otherwise, are provided royalty free. The software may be used as many times as you like until the contract is terminated. Licensor can terminate the contract at any time, in writing or Email. You must destroy your copy of the software after termination of this contract. You may not copy and distribute copies of this program, except for the reasons given in § 69d UrhG (Urhebergesetz). The copyright holder reserves the right to reclassify this software as another kind of software license product at any time (i.e. shareware, licensed royalty software, or public domain et al.). Doing so will modify the license agreement of previously distributed executables.
Use of the software is permitted for lawful scientific research purposes only. It is explicitly prohibited to use the SPHIRE-crYOLO software or parts of it, whether modified or not, for commercial purposes or operational use.
Code Immutability:
You may not modify, adapt, translate or create derivative works based upon the software. You will not reverse engineer, decompile, disassemble or otherwise attempt to discover the source code of the software except to the extent you may be expressly permitted by copyright holders or given in § 69d UrhG.
Warranty / Liability / Damages:
This program is provided “as is” and has not been fitted especially to Licensee’s purposes and comes with limited warranty and liability. Licensors do not provide any support for the software. Because this Software License Agreement qualifies as a donation, according to Section 521 of the German Civil Code (Bürgerliches Gesetzbuch – BGB) Licensors as donors are liable for intent and gross negligence only. If the Licensors fraudulently conceal a legal or material defect, they are obliged to compensate the Licensee for the resulting damage.
Licensors shall be liable for loss of data only up to the amount of typical recovery costs which would have arisen had proper and regular data backup measures been taken. For the avoidance of doubt Licensors shall be liable in accordance with the German Product Liability Act in the event of product liability. The foregoing applies also to Licensor’s legal representatives or assistants in performance. Any further liability shall be excluded.
Patent claims generated through the usage of the software cannot be directed towards the copyright holders.
Defects of the SPHIRE-crYOLO software must be notified in writing to the Licensors with a comprehensible description of the error symptoms. The notification of the defect should enable the reproduction of the error.
Third Party rights/components:
No third party components whatsoever are distributed with the SPHIRE-crYOLO software. Licensing of third party components is not part of this Software Licensing Agreement
Still, the Licensee is responsible for compliance with any respective third party license terms.
Technical Support:
Technical support may be provided via e-mail and/or website postings. While every effort is made to provide timely technical support no guarantees whatsoever are implied that technical support will be provided or that technical support, when provided, will be accurate. Software offered on this site is unsupported and supplied on an as-is basis unless you have obtained a specific maintenance contract agreement with the copyright holders.
Agreement:
This Complimentary Science Software License Agreement is effective while you use and continue to make use of these software products. If you do not agree with our Complimentary Science Software License Agreement you must not use our software products - this Complimentary Science Software License Agreement will then not apply to you. This Complimentary Science Software License Agreement is subject to change without notice. Any company names, logos, trademarks and product names mentioned or shown on associated website(s) or in software products may be copyrighted, trademarked or registered trademarked by their respective owners.
Final Provisions:
By using our software products you are automatically agreeing to and show that you have read and understood the terms and conditions contained within this Complimentary Science Software License. This Agreement shall be governed by the laws of the Federal Republic of Germany except for the UN Sales Convention.
crYOLO reference example
Here we provide quick run through example for training and picking with crYOLO. The main purpose is to check if your setup is running as expected. I will not provide detailed explanations in this text. Please note that there is a detailed tutorial.
Reference setup
We run this example on a machine with the following specification:
Titan V
Intel Core i9 7920X @ 2.90 Ghz
SSD Harddrive
crYOLO 1.5.0
Download reference data and getting started
You can download the reference data (TcdA1) here:
Then unzip the data:
unzip toxin_reference.zip -d toxin_reference/
cd toxin_reference
The toxin_reference directory contains multiple folders / files:
train_image: Folder with 12 training imagestrain_annot: Folder with 12 box files for the training imagesconfig_phosnet.json: Configuration file for crYOLOreference_model.h5: Model that I’ve trained on my machine using the commands below.reference_results: Picked particles using my machine and the reference model.
Before you start training / picking please activate your environment:
>>> source activate cryolo
Training
The training is done with this command:
cryolo_train.py -c config_phosnet.json -w 5 -e 5 -g 0
crYOLO needs 5 minutes 50 seconds to converge (5 warmup + 10 “normal” epochs). The best validation loss was 0.03042. These numbers might be a little bit different on your case.
Prediction
cryolo_predict.py -c config_phosnet.json -w model.h5 -i unseen_examples/ -o my_results
It picked 1617 particles on 12 micrographs in 3 seconds. Including filtering the image and loading the model the command needed 38 seconds.
Visualize results
napari_boxmanager 'unseen_examples/*.mrc' 'my_results/CBOX/*.cbox'
crYOLO configuration file
The config file is organized in the sections model, training, validation and other. This is how a typical configuration file looks like:
{
    "model": {
        "architecture": "PhosaurusNet",
        "input_size": 1024,
        "anchors": [
            220,
            220
        ],
        "max_box_per_image": 700,
        "norm": "STANDARD",
        "filter": [
            0.1,
            "filtered_tmp/"
        ]
    },
    "train": {
        "train_image_folder": "train_image/",
        "train_annot_folder": "train_annot/",
        "train_times": 10,
        "pretrained_weights": "",
        "batch_size": 6,
        "learning_rate": 0.0001,
        "nb_epoch": 200,
        "object_scale": 5.0,
        "no_object_scale": 1.0,
        "coord_scale": 1.0,
        "class_scale": 1.0,
        "saved_weights_name": "out/mymodel.h5",
        "debug": true
    },
    "valid": {
        "valid_image_folder": "",
        "valid_annot_folder": "",
        "valid_times": 1
    },
    "other": {
        "log_path": "logs/"
    }
}
In the following you find a description of each entry.
Model section
architecture: The network used in the backend of crYOLO. Right we support crYOLO, YOLO, PhosaurusNet. Default and recommended is PhosaurusNet.input_size: This is the size to which the short side of your input image is rescaled before passed through the network (it is NOT the size of your micrograph!). The long side will be scaled according the aspect ratio. In this example, a square image would be resized to 1024x1024.anchors: Anchors in YOLO are kind of a priori knowledge. You should specifiy your box size here.max_box_per_image: Maximum number of particles in the image. Only for handling the memory. Keep the default of 700.norm: Normalization that is applied to the images. STANDARD will subtract the image mean and divide by the standard deviation. Experimental: Gaussian Mixture Models (GMM) fit a 2 component GMM to you image data and normalizes according the brighter component. This ensures that it always normalize with respect to ice but slows down the training.overlap_patches: Optional and deprecated. Only needed when using patch mode. Specifies how much the patches overlap. In our lab, we always keep the default value.num_patches: Optional and deprecated. If specified the patch mode will be used. A value of “2” means, that 2×2 patches will be used. With PhosaurusNet you typically don’t need it.filter: Optional. Specifies the absolute cut-off frequency for the low-pass filter and the corresponding output folder. CrYOLO will automatically filter the data intrain_image_folderandvalid_image_folderand save it into the output folder. It will automatically check if a image provided in the train_image_folder is already filtered and use it in case. Otherwise it will filter it. You can also use neural network based filtering.
Training section
train_image_folder: Path to the image folder containing the images to train on. This could either be a separated folder containing ONLY your training data, but it could also be just the directory containing all of your images. CrYOLO will try to find the image based on annotation data you provided intrain_annot_folder.train_annot_folder: Path to folder containing the your annotation files like box or star files. Based on the filename crYOLO will try to find the corresponding images intrain_image_folder. It will search for image files, which containing the box filename.train_times: How often each image is presented to the network during one epoch. Default is 10 and should be kept until you have many training images.pretrained_weights: Path to h5 file that is used for initialization. Specify it if you want to use weights from a previous dataset as initialization.batch_size: Specified the number of images crYOLO process in parallel during training. Strongly depending on the memory of your graphic card. 4 should be fine for GPUs with 8GB memory. You can increase in case you have more memory or decrease if you have memory problems. Bigger batches tend to improve convergence and even the final error.learning_rate: Defines the step size during training. Default should be kept.nb_epoch: Maximum number of epochs the network will train. I basically never reach this number, as crYOLO stops training if it recognize that the validation loss is not improving anymore.object_scale: Penalty scaling factor for missing picking particles.no_object_scale: Penalty scaling factor for picking background.coord_scale: Penalty scaling factor for errors in estimating the correct position.class_scale: Irrelevant, as crYOLO only has the “class” “particle”.log_path: Path to folder. During training, crYOLO saves there some logs for visualization in tensorboard. Tensorboard is used to visualize curves for training and validation loss.saved_weights_name: Every time the network improves in terms of validation loss, it will save the model into the file specified here.debug: If true, the network will provide several statistics during training.
Validation section
valid_image_folder: If not specified, crYOLO will simply select 20% of the training data for validation. However it is possible to specify to use specific images for validation. This should be the path to folder containing these files.valid_annot_folder: If not specified, crYOLO will simply select 20% of the training data for validation. However it is possible to specify to use specific images for validation. This should be the path to folder containing these validation box files.valid_times: How often each image is presented the network during validation. 1 should be kept.
crYOLO on sparsely labeled data
In the first preprint of crYOLO we wrote the following sentence without any comments:
Ideally, each micrograph should be picked to completion.
However, you don’t have to pick all particles in a micrograph to train crYOLO. Here I want to show how crYOLO performs with only sparsely labeled micrographs.
Toxin
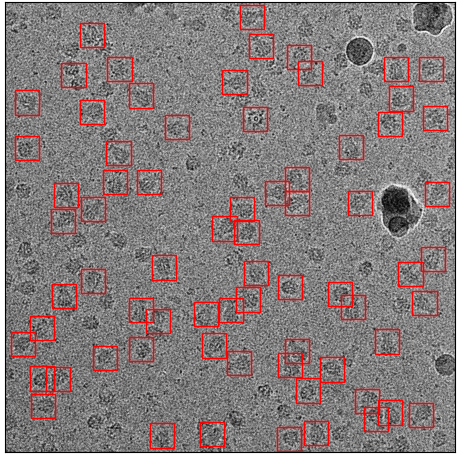
I took our toxin dataset, which I’ve used to train crYOLO before. The training set comprises 14 images with 1586 particles (~113 particles per micrograph). An example is shown here:

Training image with all particles labeled
I then removed randomly 80% of the particles (above) and used it for training (default settings as in the tutorial). The training set now consists of only 314 particles:
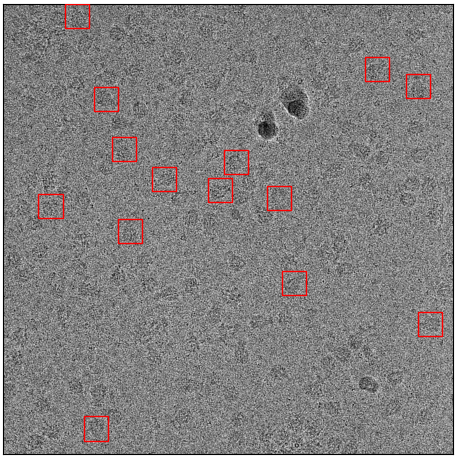
Sparsely labeled micrograph from the sparse training set
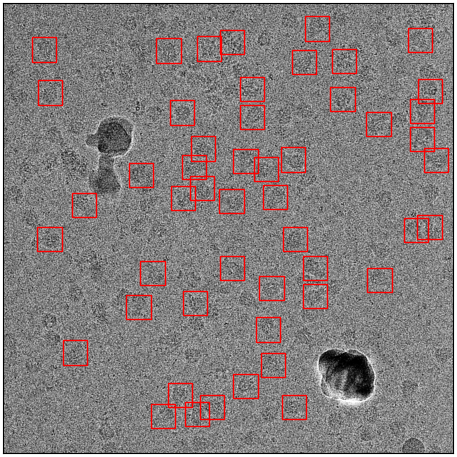
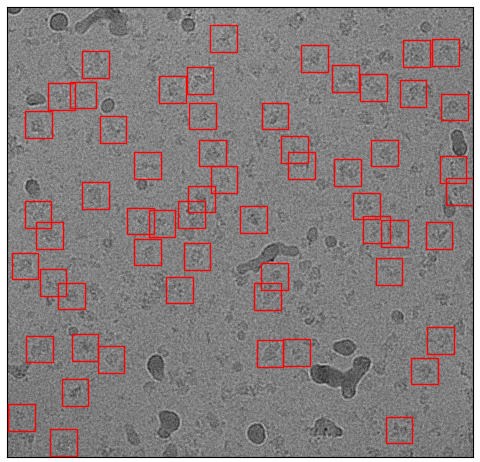
I now use the trained model to pick the whole dataset. The picking with the default threshold is quite dissatisfying, as it only picks ~65 particles per micrograph:
First example: Picked particles with default threshold 0.3
Second example: Picked particles with default threshold 0.3
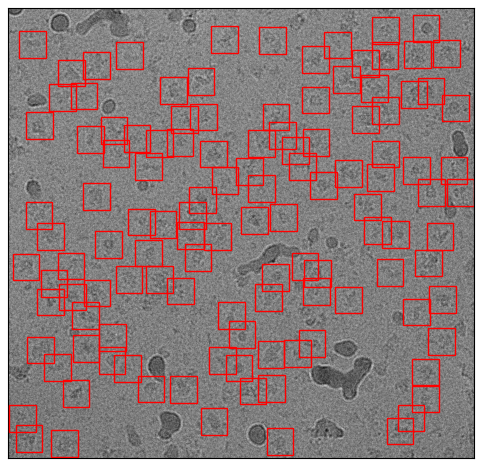
However, if one uses the cbox files and the box manager, you can easily choose a different confidence threshold. With a threshold of 0.14 for example, you practically get all of your particles while at the same time excluding contamination:
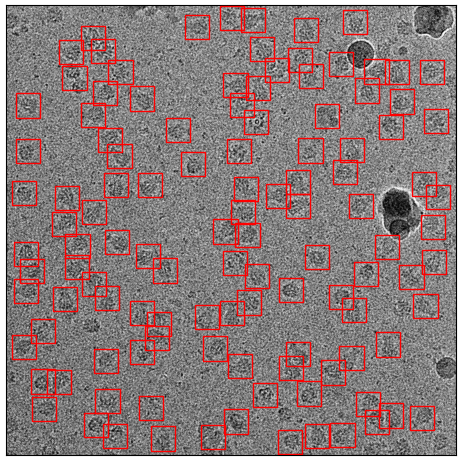
First example: Picked particles with a threshold of 0.14 found by using cbox files.
Second example: Picked particles with a threshold of 0.14 found by using cbox files.
Warning
The recall reported during training in such cases will be misleading, as it is calculated based on the default threshold of 0.3.
ATP Synthase
I did the same with ATP synthase. The original training set had 1723 particle from 91 micrographs. The sparsely labeled training dataset used the same training images but only with 334 particles labeled from 91 micrographs. Here are examples:
Original training set
Sparsely picked training set
Now the comparision between picking with default and picking with an adjusted threshold:
Picked with default threshold 0.3
Picked with threshold 0.14
And another example:

Picked with default threshold 0.3
Picked with threshold 0.14
Again, it still picks basically everything while avoiding contamination.
TRPC4
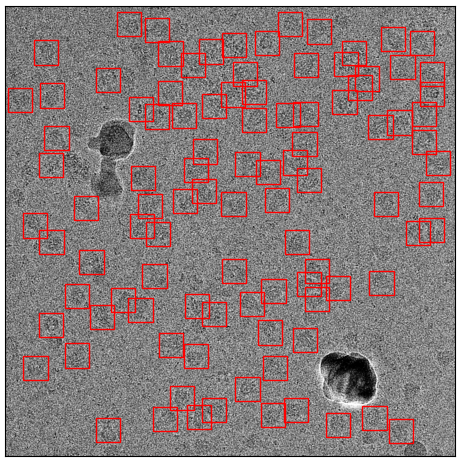
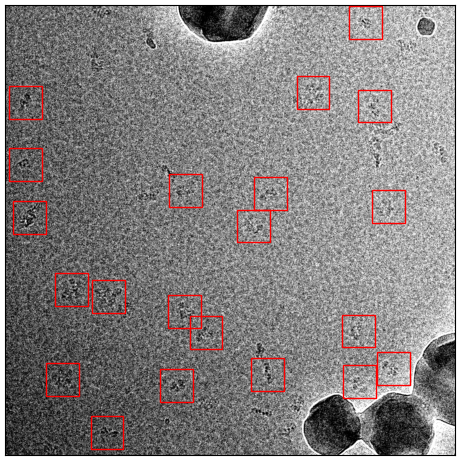
The last example that I’ve chosen is TRPC4, as it contains much more contamination. The original training set comprises 32 images with 3038 particles (~94 particles / image):
Example micrograph from the original training set.
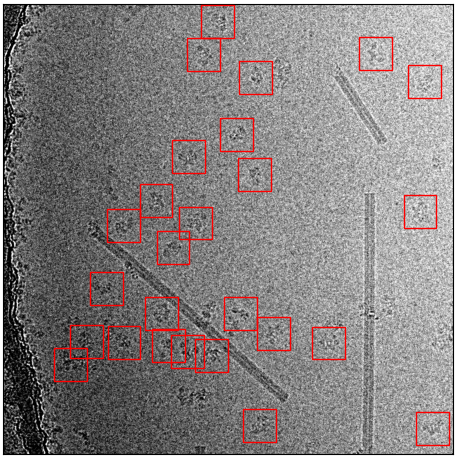
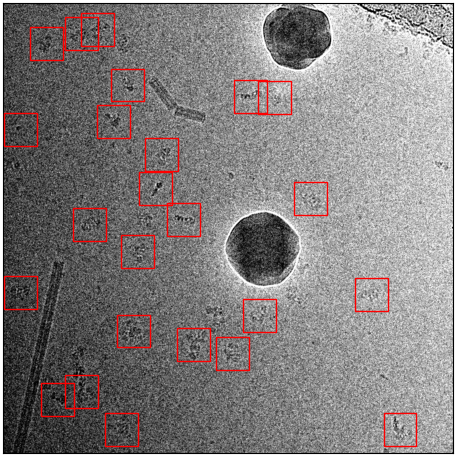
Again, the same procedure as with toxin and ATP synthase. I removed 80% of particles randomly:
Example micrograph from the sparsely labeled training set.
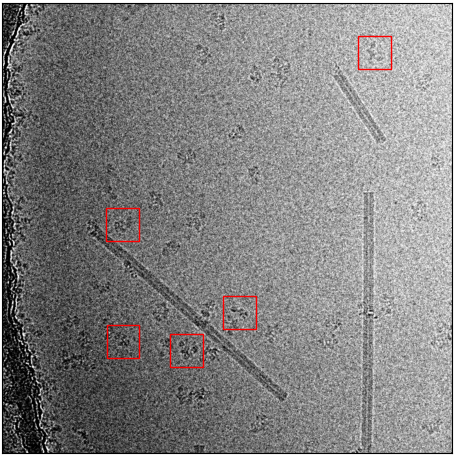
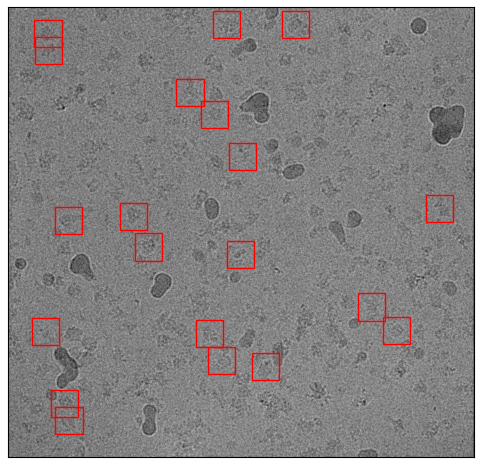
I trained the model, and picked again. Here are the results for picking with the default threshold:
Picking result with default threshold 0.3
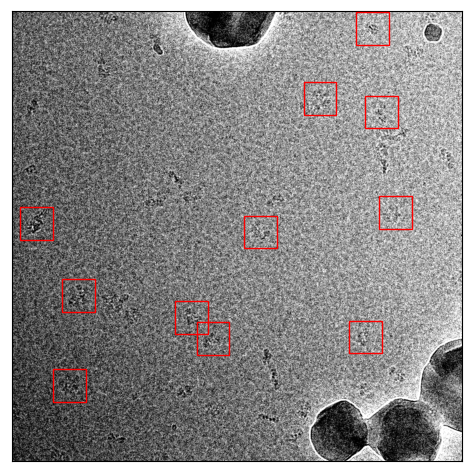
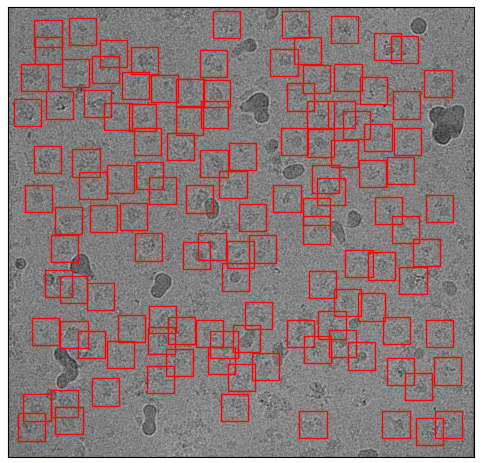
It missed a lot, but picked far more that one would expect from the sparsely labeled training data. The missing particles appearing when you reduce the threshold to 0.14:
Picking result with threshold 0.14
Particles picked, contamination skipped, mission accomplished :-)
crYOLO integration as Environment Module
Here we describe how to integrate crYOLO as Environment Module. I assume you followed the normal installation instructions. The first you have to do is to find out your environment path with:
>>> conda env list
In my case it is:
cryolo /home/twagner/Applications/miniconda3/envs/cryolo
The next step is to navigate to your module files and create a folder for crYOLO. Inside this folder, create file with the current version number like “1.5”. The content of this file looks like this:
#%Module -*- tcl -*-
##
## dot modulefile
##
proc ModulesHelp { } {

  puts stderr "\tAdds anaconda to your environment variables,"
}

module-whatis "Adds anaconda to your environment variables"


set              root              /home/twagner/Applications/miniconda3/envs/cryolo

setenv CRYOLOPATH $root
prepend-path      PATH              $root/bin
crYOLO networks
Introduction
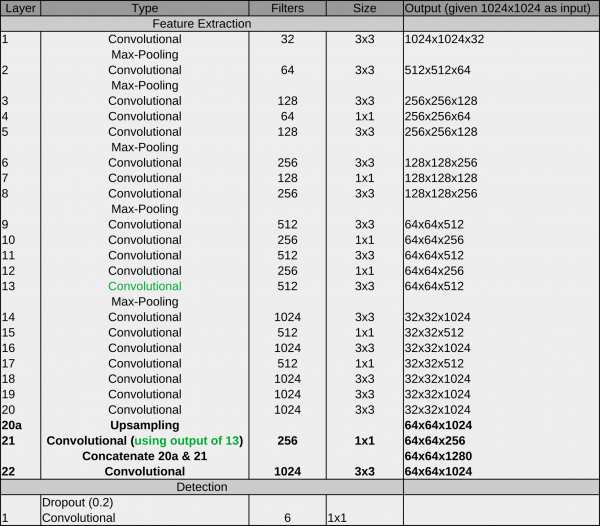
The original YOLO architecture looks like this:
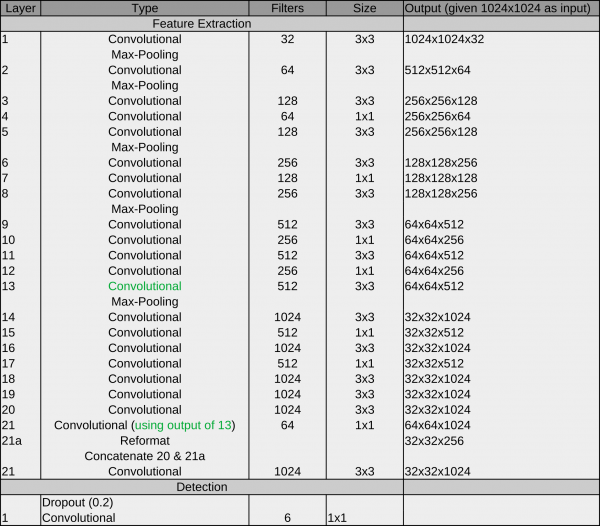
The main components are convolutional operations and max pooling operations:
Convolutional layer: A convolutional learn local patterns. For 2D images, these are patterns in a small region of the input image. In the YOLO architecture, these are 1×1 or 3×3 windows. The output of a convolutional layer is called feature map.
Max-pooling operation: Max-pooling operations downsampling the feature maps of previous layers. This enables the following convolutional layers to see a larger extends of the input image.
Another characteristic of this architecture is the passthrough connection between 13 and 21. it helps the network to utilize low level features during detection.
Since crYOLO’s inception, several networks were introduced. I will explain them in chronological order.
Network #1 crYOLO
During development, we recognized that the original YOLO network does not work on very small particles. But a subset of the YOLO network (in principle, the first 13 layers) does:
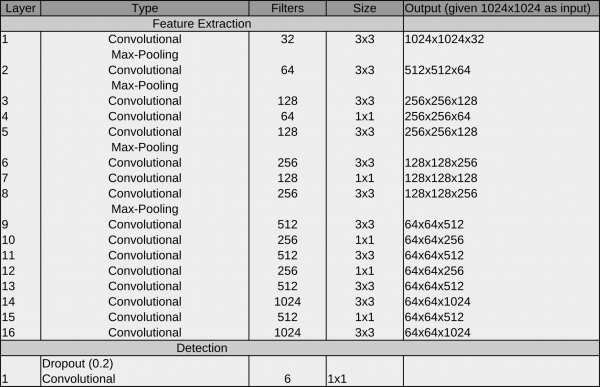
The reason for the better performance on small particles is that the final grid is finer compared to YOLO (64×64 vs 32×32). As it still worked for big particles, we started with the crYOLO network.
How to use
The network is still available in crYOLO and you can use it with the config below. However, we recommend using PhosaurusNet for picking single particles.
{
"model" : {
"architecture": "crYOLO",
"input_size": 1024,
"anchors": [160,160],
"max_box_per_image": 600
}
"train": {
"train_image_folder": "train_image/",
"train_annot_folder": "train_annotation/",
"train_times": 10,
"pretrained_weights": "model.h5",
"batch_size": 6,
"learning_rate": 1e-4,
"nb_epoch": 50,
"warmup_epochs": 0,
"object_scale": 5.0 ,
"no_object_scale": 1.0,
"coord_scale": 1.0,
"class_scale": 1.0,
"log_path": "logs/",
"saved_weights_name": "model.h5",
"debug": true
},
"valid": {
"valid_image_folder": "",
"valid_annot_folder": "",
"valid_times": 1
}
}
Network #2 YOLO with patches
However, while training the general model with an increasing training dataset, we realized that crYOLO did not have enough capacity to train a good general network. To circumvent the “small particle” problem, we split the image into a small number of tiles (or patches). Each tile was then downsampled to the network input size and served as input data. Using this trick, we effectively increased the grid size, and enabled the YOLO network to pick small particles. Furthermore the YOLO network performed very well on our training set for the general model. Therefore, YOLO combined with the so called “patch mode” was our second network.
How to use it:
The config below uses the YOLO network with 2×2 patches:
{
    "model" : {
        "architecture":         "YOLO",
        "input_size":           768,
        "anchors":              [160,160],
        "max_box_per_image":    600,
        "overlap_patches":      200,
        "num_patches":          2,
        "filter":               [0.1,"filtered"]
    },

    "train": {
        "train_image_folder":   "train_image/",
        "train_annot_folder":   "train_annotation/",
        "train_times":          10,
        "pretrained_weights":   "model.h5",
        "batch_size":           6,
        "learning_rate":        1e-4,
        "nb_epoch":             50,
        "warmup_epochs":        0,

        "object_scale":         5.0 ,
        "no_object_scale":      1.0,
        "coord_scale":          1.0,
        "class_scale":          1.0,
        "log_path":             "logs/",
        "saved_weights_name":   "model.h5",
        "debug":                true
    },

    "valid": {
        "valid_image_folder":   "",
        "valid_annot_folder":   "",

        "valid_times":          1
    }
}
Network #3 PhosaurusNet
At some point, we realized that the patch mode introduced a problem on images with particles on the carbon edge: CrYOLO picked sometimes particles on the carbon edge. As with patch mode, the network did not see the complete micrograph anymore, which made it harder to reliably detect the carbon edge. Moreover, passing multiple patches through the network is computationally more expensive as processing whole micrograph in a single pass. We had another idea to circumvent this problem which combines the advantages of the crYOLO and the YOLO networks. PhosaurusNet upscales the feature map after layer 21 by a factor of two and then concatenates the feature map of layer 13. This network finally picked small particles, generalized well for our training data, does not pick on the carbon edge, still sees the complete micrograph and is faster.
We recommend to use this network for picking your data!
Import crYOLO filament coordinates into Relion
After the picking of filaments with crYOLO is done, one might want to import them into Relion 3. In this example I assume the following:
The folder micrographs contains your images. In this example the filenames are Actin-ADP-BeFx_NUMBER.mrc.
The folder picked_boxes contains your box files in helicon format.
The following illustrates how you can import the micrographs and box files into Relion:
Move the box files from
picked_boxesinto themicrographsdirectory. The box files and the micrographs should be in the same directory before importing them into Relion.Start Relion
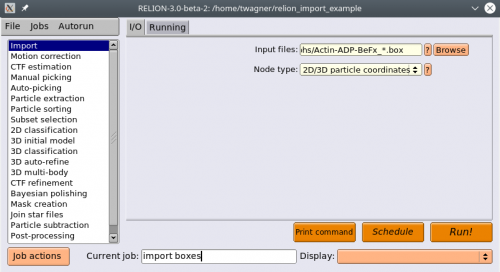
We will start by importing the box files. Select the Import action. Under Node type, select 2D/3D particle coordinates. Under input files, point to your box files in the
micrographsdirectory, where everything starting from the running number is replaced by a * (except the suffix (e.g. _autopick.box), if one exists). Press Run!
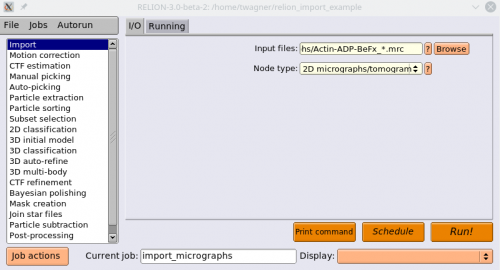
Now we import the corresponding MRC files. Select the Import action again. Under Node type, enter 2D micrographs/tomogram. Under input files, point to your mrc files in the micrographs directory, where the running number is replaced by a “*”. Press Run!
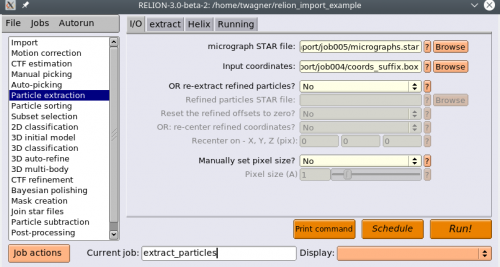
Now we will extract the particles. Select the Particle extraction action. For micrograph STAR file, select the
micrographs.starfile, and for Input coordinates selectcoords_suffix.box.
Warning
Use the micrographs.star file from your CTF estimation. It provides necessary information for further processing. Alternatively, you can set your Pixel size manually in the I/O tab of the Particle extraction job.
Go to the extract tab and set your Particle box size.
Select the Helix tab, and set Extract helical segments? to Yes and Coordinates are start-end only? to No. Also change your Tube diameter. Press Run!
Now your particles should be extracted!
Import coordinates into Relion 4
In this tutorial we describe how to import crYOLO coordinates into Relion 4. I assume that your micrographs are somewhere in the Relion project directory.
Move or softlink your coordinates somewhere into the relion project directory.
Change directory into the relion project directory
cd path/to/my/relion/project/directory/
Create the
autopick.starfile with the following command:
cryolo_boxmanager_tools.py createAutopick -m 'path/to/micrographs/*.mrc' -c 'path/to/box/or/star/files/*.star' -o output/Warning
Its important to use relative paths for the -m and -c option.
It will create the
autopick.starfile in the folderoutput.
Open Relion and select the Particle extraction Job. For micrograph STAR file, select the
micrographs.starfile from your CTF estimation. For Input coordinates choose the freshly generatedautopick.star.
Now your particles should get extracted!
Import coordinates into cryoSPARC
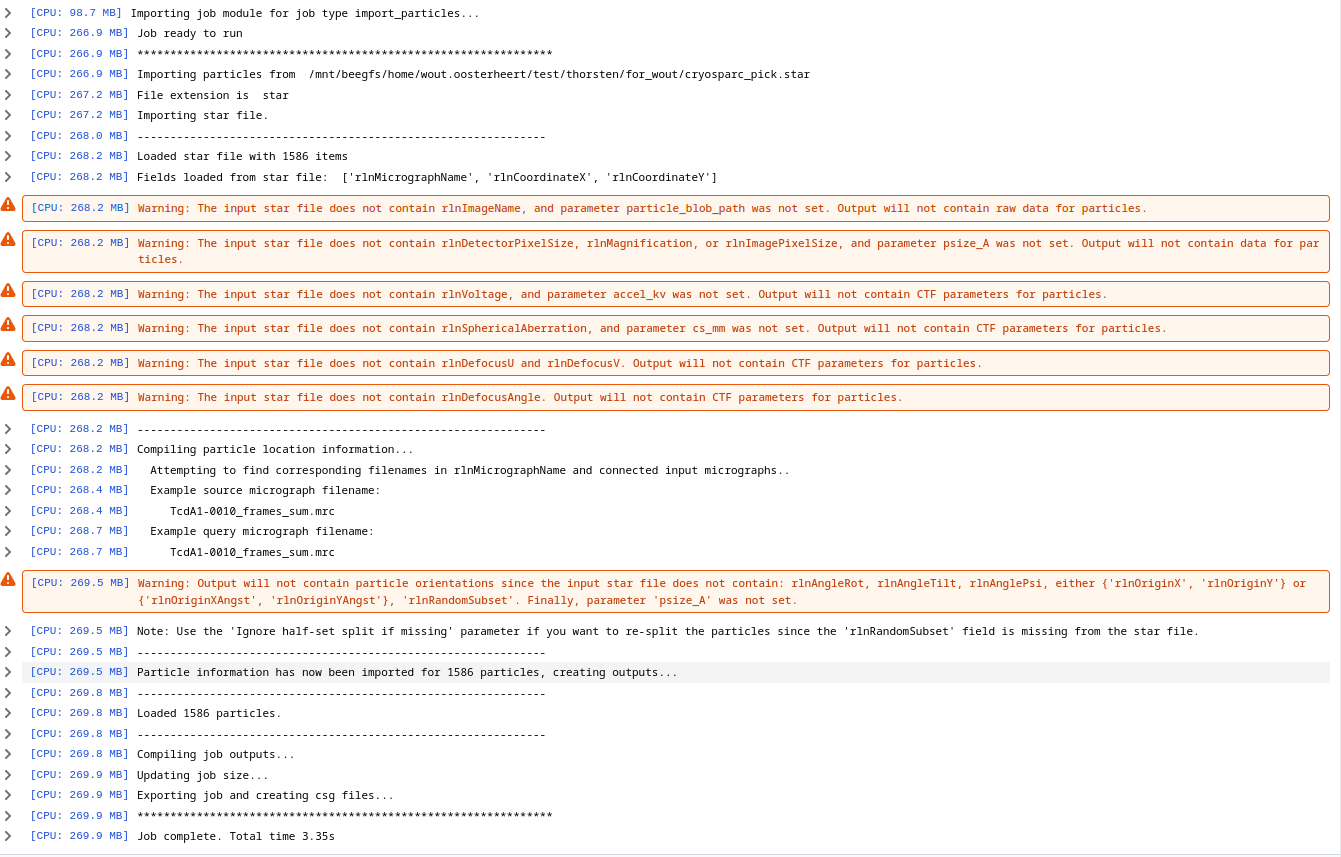
crYOLO 1.9 writes STAR files that can be imported into cryoSPARC. Here is how you do it.
Create a new job Import Particle Stack
Choose as Particle meta path the
cryosparc.starfile written by crYOLO.In case you didn’t pick on micrographs that were motion corrected by cryoSPARC, plase activate Remove leading UID in input micrograph path
Activate Ignore raw data
Activate Ignore pose data
Click in Queue Job. You will see some warnings but can ignore them, its mostly that the STAR files do not include CTF information. Your output should look similar to this:
General model data sets
For training the general model we used
18 internal but yet not published data sets
14 EMPIAR data sets,
10 simulated data sets
6 user contributed data sets (2 of them are apoferritin)
10 particle free data sets with only contamination
At this point this site lacks information about internal and user contributed data sets. We will provide basic information about the size as soon as possible.
From EMPIAR we used the data sets with the following IDs:
10023
10004
10017
10025
10028
10050
10072
10081
10154
10181
10186
10160
10033
10097
For the simulated data sets we used the following PDB models:
1sa0
5lnk
5xnl
6b7n
6bhu
6dmr
6ds5
6gdg
6h3n
6mpu
The micrographs of the empty grids can be found here:
https://zenodo.org/record/2563042
Train your own general model
Training a model for a specific dataset is very easy with crYOLO. However, you might have multiple data collections of the same particle with different settings, a different camera or another microscope. A model trained on the data of one data collection, might not perform very good on a dataset from another data collection.
However, you can easily train a crYOLO model that generalize well on data recorded under multiple conditions. To achieve this, all you have to do is to merge training data of multiple data sets. The result will be a model that can be applied to a new dataset from a new data collection without additional training.
Here is our recommendation how to organize the training data. Instead of copying your images and box files directly into train_images / train_annot, you can copy them into subfolders. One for each data collection:
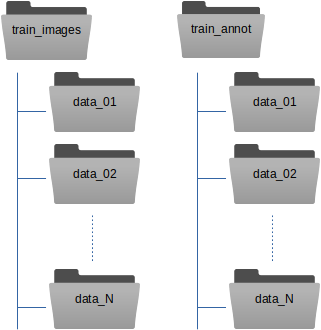
The train_image_folder and train_annot_folder parameters in the crYOLO configuration file (e.g. config.json) still point to the root directories train_images and train_annot respectively. The parameter anchors should be set roughly to the average of all particle box sizes. Other than that, the training of a general model does not differ from training a model from scratch.
Hint
When running the training of a general model, we always use the --warm_restarts. Moreover, a general model with multiple datasets should train for a longer time. If we train our general model on 63 datasets we use the option --early 300.
Train crYOLO based on good classes
Here I assume you that you have star file particles.star that contain the columns _rlnMicrographName, _rlnCoordinateX and _rlnCoordinateY.
When you are working with RELION, you should have such a file.
Note
Support for cryoSPARC .cs files will follow soon!
With the cryolo_boxmanager_tools 1.5 you can create training data based on this star file.
To create the training annotation based on good 2D classes your need to extract star files per micrograph. You can do that with the following command:
cryolo_boxmanager_tools.py class2Dextract -s particles.star -o out_annotation/ -n 10
It is better to train crYOLO with micrographs where many particles are annotated. The parameter -n 10 writes those 10 star files that contain the most particles.
Next you can simply follow the standard workflow to train crYOLO, but instead creating manual training data (step 1) you use the generated STAR files.