Tutorials
Tutorial 1: Pick particles without training using a general model
Here you can find how to apply the general models we trained for you. If you would like to train your own general model, please see our extra wiki page: How to train your own general model.
Our general models can be found and downloaded here: Download and Installation.
If you followed the installation instructions, you now have to activate the cryolo virtual environment with
source activate cryolo
1. Start crYOLO
You can use crYOLO either by command line or by using the GUI. The GUI should be easier for most users. You can start it with:
cryolo_gui.py
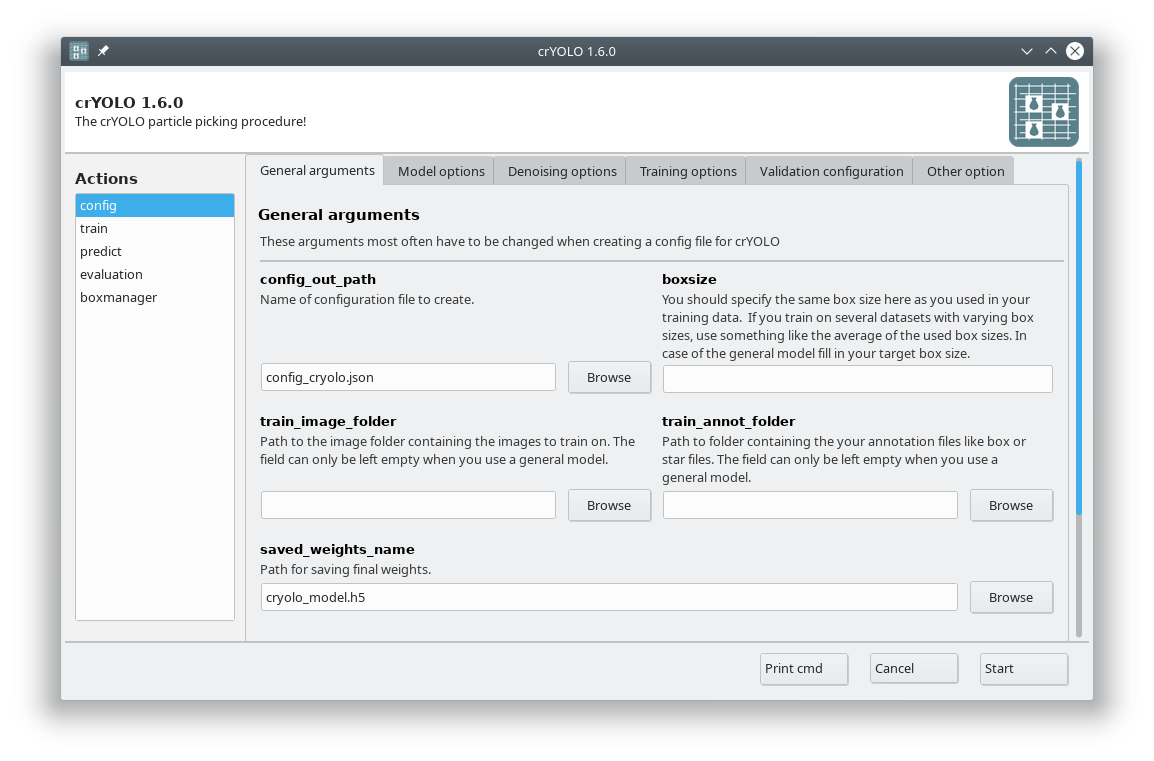
The crYOLO GUI is essentially a visualization of the command line interface. On left side, you find all possible “Actions”:
config: With this action you create the configuration file that you need to run crYOLO.
train: This action lets you train crYOLO from scratch or refine an existing model.
predict: If you have a (pre)trained model you can pick particles in your data set using this command.
evaluation: This action helps you to quantify the quality of your model.
boxmanager: This action starts the cryolo boxmanager. You can visualize the picked particles with it or create training data.
Each action has several parameters which are organized in tabs. Once you have chosen your settings you can press Start (just as example, don’t press it now ;-)), the command will be applied and crYOLO shows you the output:
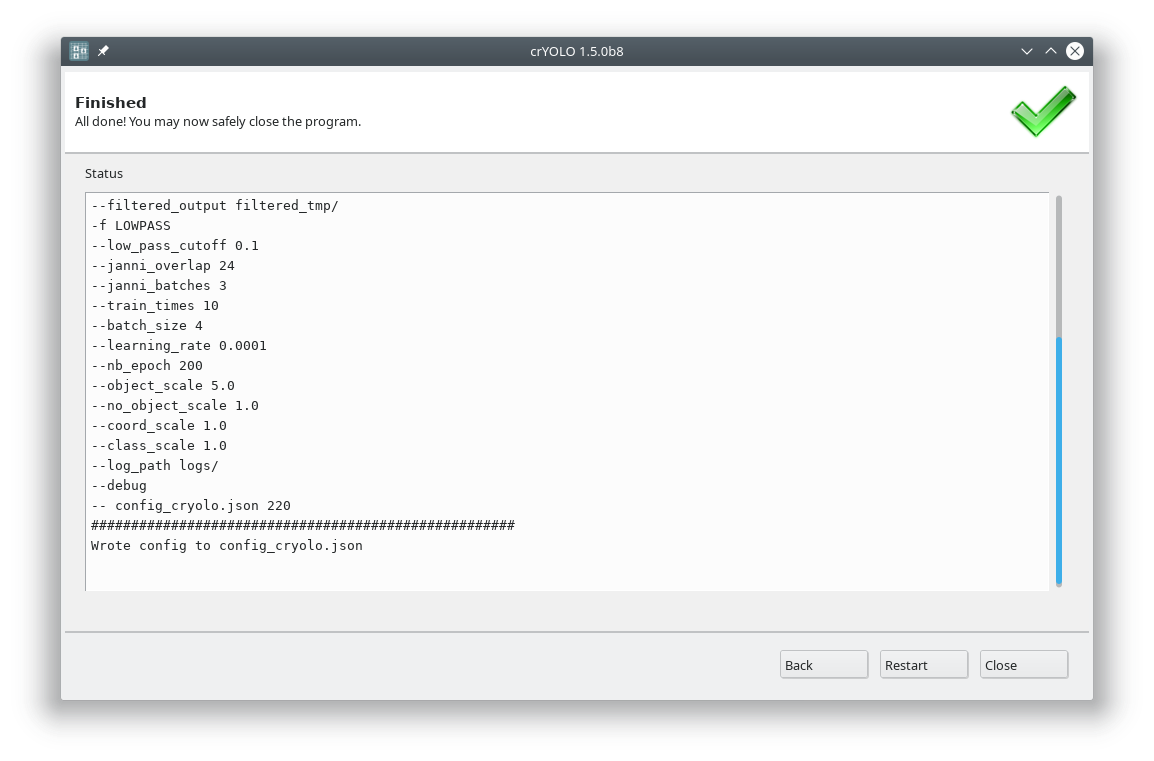
It will tell you if something went wrong. Moreover, it will tell you all parameters used. Pressing Back brings you back to your settings, where you can either edit the settings (in case something went wrong) or go to the next action.
2. Configuration
In the GUI choose the config action. Fill in your target box size and leave the train_image_folder and train_annot_folder fields empty.
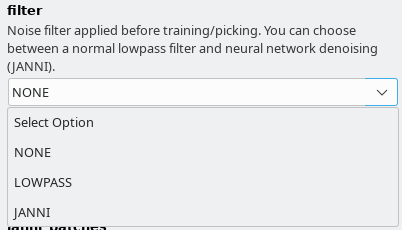
There are three general models available. It is important that you choose the same filtering options in Denoising options tab as we did during training the general models. In the following are the filtering settings that we used for the respective general models:
General model trained for low-pass filtered images : As filter select LOWPASS and low_pass_cutoff of 0.1
General model trained for JANNI-denoised images: As filter select JANNI and the janni general model for janni_model. Keep the defaults for janni_overlap and janni_batches
General model for negative stain images: As filter select NONE
Anchor size is optional
In the configuration file, the field “anchors” is optional during prediction. That means, you don’t to define a box size during prediction, as crYOLO does a size estimation internally. This is of advantage for automated pipelines. You can simply delete the entry in configuration file. This should not affect the picking quality. The estimated size is still contained in .cbox files. Coordinates in EMAN and STAR format are written with a box size of 0 in that case.
Press Start to write the configuration file to disk.
Hint
Alternative: Create the configuration file using the command line
In the following I assume that you target box size is 220. Please adapt if necessary. For the general Phosaurus network trained for low-pass filtered cryo images run:
cryolo_gui.py config config_cryolo.json 220 --filter LOWPASS --low_pass_cutoff 0.1
For the general model trained with neural-network denoised cryo images (with JANNI’s general model) run:
cryolo_gui.py config config_cryolo.json 220 --filter JANNI --janni_model /path/to/janni_general_model.h5
For the general model for negative stain data please run:
cryolo_gui.py config config_cryolo.json 220 --filter NONE
3. Picking
Select the action predict and fill all arguments in the Required arguments tab:
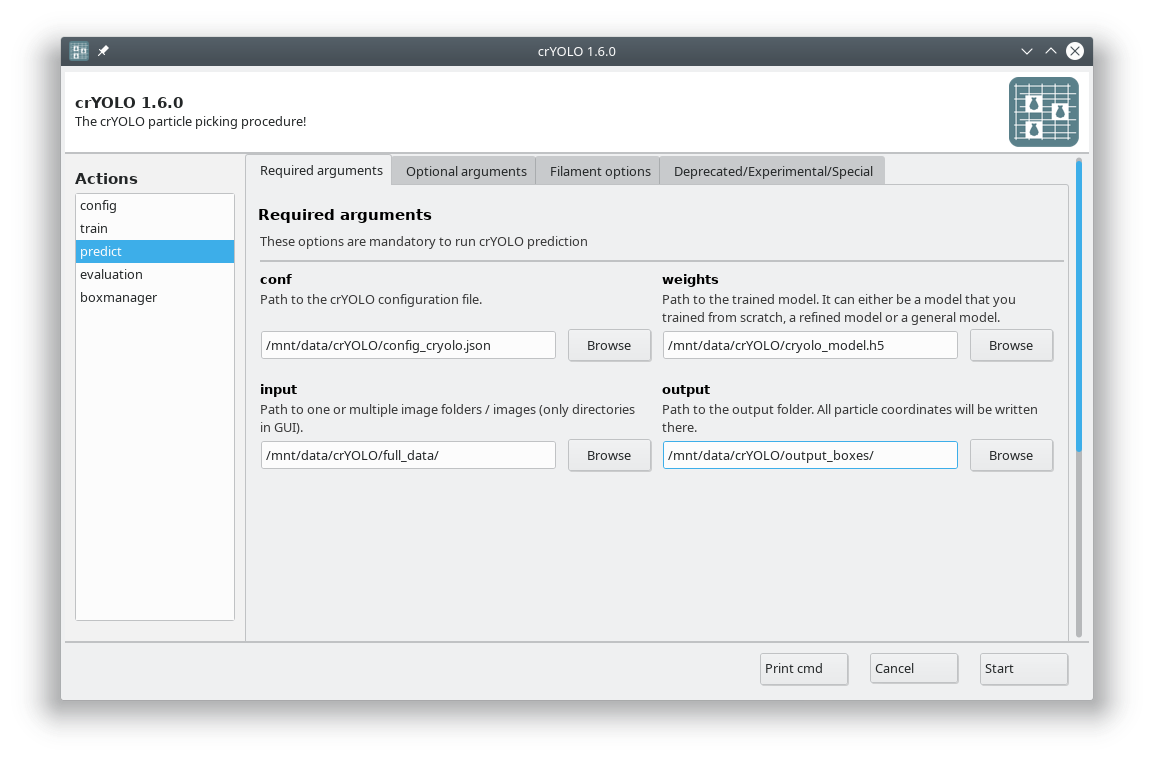
Adjusting confidence threshold
In crYOLO, all particles have an assigned confidence value. By default, all particles with a confidence value below 0.3 are discarded. If you want to pick less or more conservatively you might want to change this confidence threshold to a less (e.g. 0.2) or more (e.g. 0.4) conservative value in the Optional arguments tab. However, it is much easier to select the best threshold after picking using the CBOX files written by crYOLO as described in the next section.
crYOLO on cluster machines
Cluster machines typically use parallel filesystem, which allow the parallel reading of files.
In these cases you should use more processes as cpu cores available. In GUI the you can find num_cpu under Optional arguments.
On our cluster we oversubscribe a node (4 cores) by factor of 7 by setting num_cpu to 32. In the command line you can do that by using
the option --num_cpu NUMBER_OF_PROCESSES.
Monitor mode
When this option is activated, crYOLO will monitor your input folder. This especially useful
for automation purposes. You can stop the monitor mode by writing an empty file with the
name stop.cryolo in the input directory. Just add --monitor in the command line or check
the monitor box in in the Optional arguments tab
Press the the Start button to run the prediction. You can also press the Submit button to submit the job to a queueing system
After picking is done, you can find four folders in your specified output folder:
CBOX: Contains a coordinate file in .cbox format each input micrograph. It contains all detected particles, even those with a confidence lower the selected confidence threshold. Additionally it contains the confidence and the estimated diameter for each particle. Importing those files into the boxmanager allows you advanced filtering e.g. according size or confidence.EMAN: Contains a coordinate file in .box format each input micrograph. Only particles with the an confidence higher then the selected (default: 0.3) are contained in those files.STAR: Contains a coordinate file in .star format each input micrograph. Only particles with the an confidence higher then the selected (default: 0.3) are contained in those files.DISTR: Contains the plots of confidence- and size-distribution. Moreover, it contains a machine readable text-file the summary statistics about these distributions and their raw data in separate text-files.
Hint
Import coordinates into Relion 4
To import your coordinates into Relion 4 a few additional steps are necessary. You find a tutorial how to do that in the “Other pages” section.
Hint
Alternative: Run prediction from the command line
To pick all your images in the directory full_data with the model weight file cryolo_model.h5 (e.g. or gmodel_phosnet_X_Y.h5 when using the general model) and and a confidence threshold of 0.3 run:
cryolo_predict.py -c config.json -w cryolo_model.h5 -i full_data/ -g 0 -o boxfiles/ -t 0.3
You will find the picked particles in the directory boxfiles.
Hint
Alternative: Run prediction as external job from Relion
External job support for Relion was implemented by Wolfgang Lugmayr and can be found here:
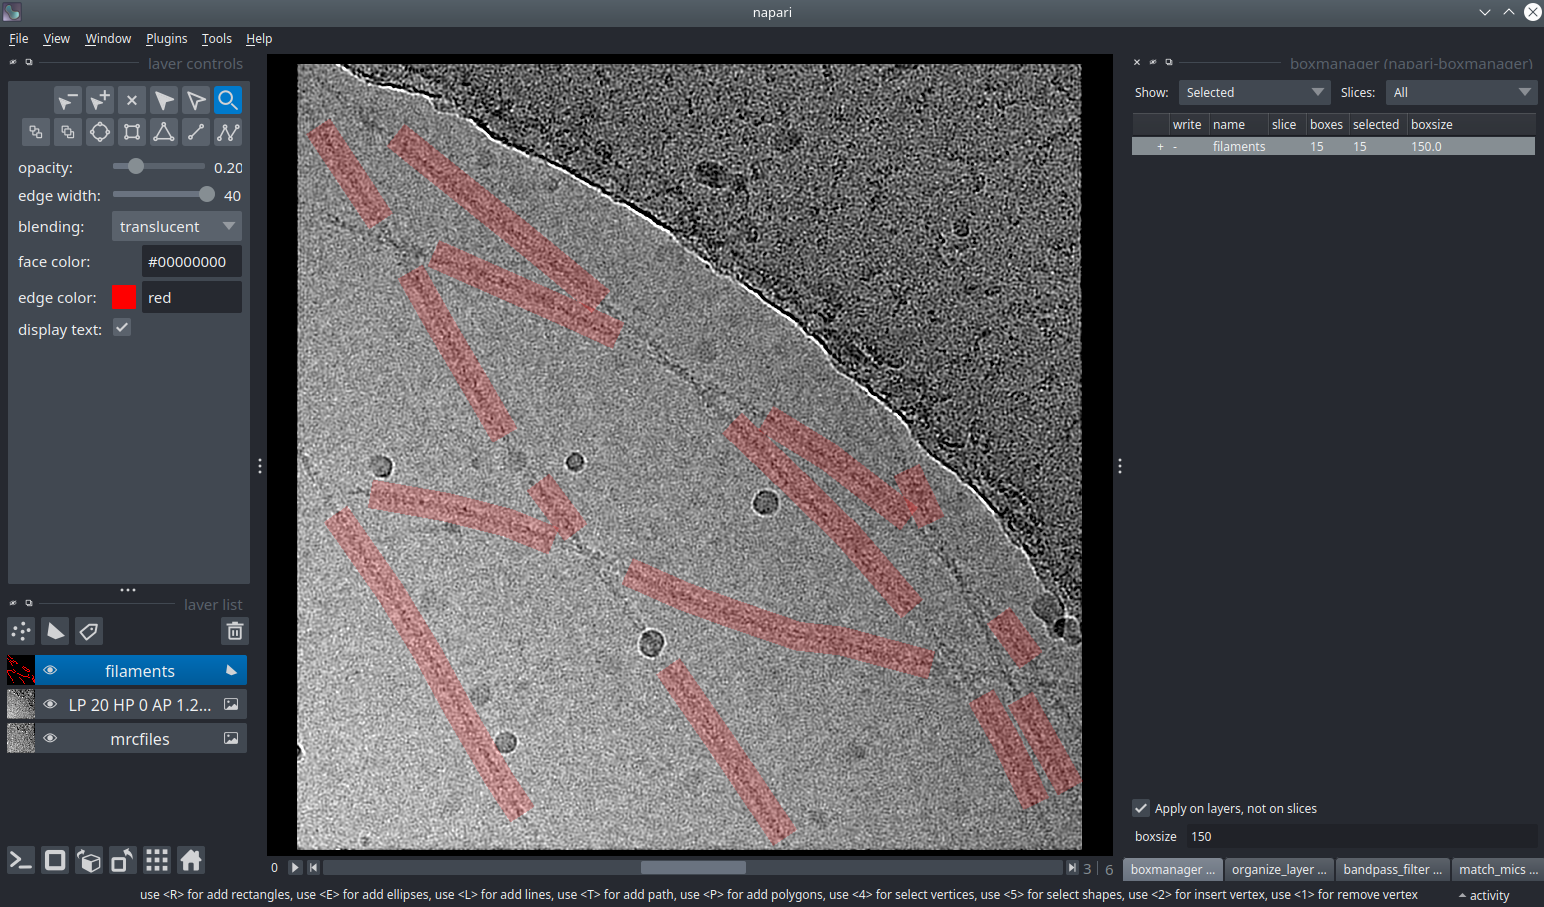
4. Visualize the results
To visualize your results you can use the boxmanager:
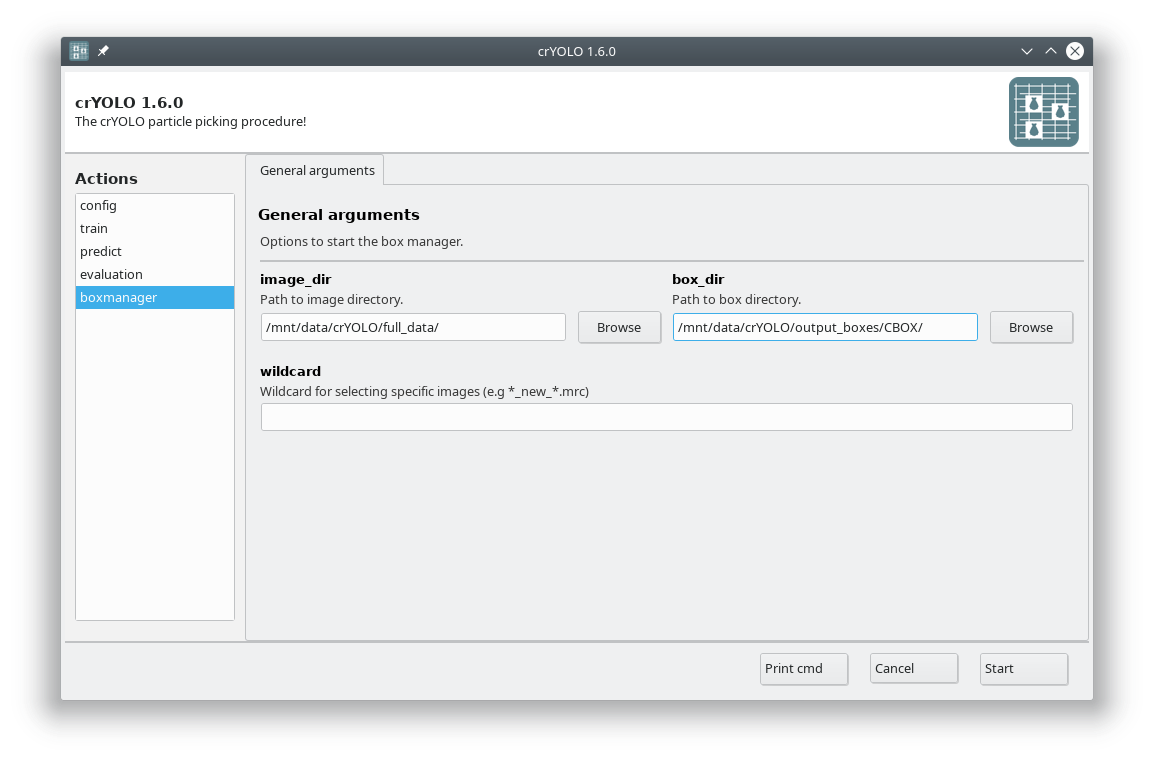
As image_dir you select the full_data directory. As box_dir you select the CBOX folder (or CBOX_FILAMENT_SEGMENTED in case of filaments).
Hint
Alternative: Open it via command line
You can also open the results via command line:
napari_boxmanager 'full_data/*.mrc' 'boxfiles/CBOX/*.cbox'
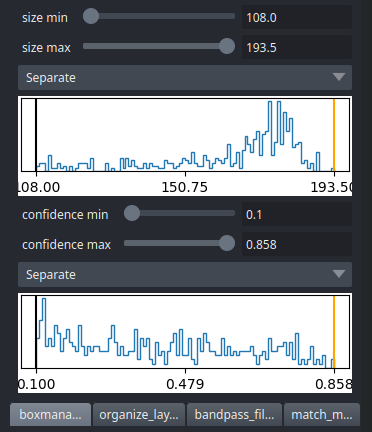
CBOX files contain besides the particle coordinates more information like the confidence and the estimated size of each particle. When importing .cbox files into the box manager, it enables more filtering options in the GUI. You can plot size- and confidence distributions. Moreover, you can change the confidence threshold, minimum and maximum size and see the results in a live preview. If you are done with the filtering, you can then write the new box selection into new box files.
Tutorial 2: Pick particles by training a model for your data
This tutorial explains you how to train a model specific for you dataset.
If you followed the installation instructions, you now have to activate the cryolo virtual environment with
source activate cryolo
1. Data preparation
In the following I will assume that your image data is in the folder images.
The next step is to create training data. To do so, we have to pick manually in several images. Ideally, the images are picked to completion. However, it is not necessary to pick all particles. crYOLO will still converge if you miss some (or even many).
How many images have to be picked?
It depends! Typically 10 images are a good start. However, that number may increase / decrease due to several factors:
A very heterogeneous background could make it necessary to pick more images.
When you refine a general model, you might need to pick fewer images.
If your micrograph is only sparsely decorated, you may need to pick more images.
We recommend that you start with 10 images, then autopick your data, check the results and finally decide whether to add more micrographs to your training set. If you refine a general model, even 5 images might be enough.
To create your training data, we developed a dedicated napari plugin called “napari-boxmanager”.
Start the box manager with the following command:
napari_boxmanager
Now press File -> Open Folder and the select the images directory.
Increase the contrast
You might want to run a low pass filter before you start picking to get better contrast.
Switch to tab bandpass_filter and check if the default LP resolution is ok and that the extracted Pixel size is correct.
Press Run to get a new layer with your low pass filtered images. It will filter the images on-the-fly.
Create particle layer
First you need to create a new layer for picking particles
Switch to the tab Organize_layer.
Click Create particle layer. I assume that you only have one image stack open, in case you don’t please adapt Target image layer accordingly.
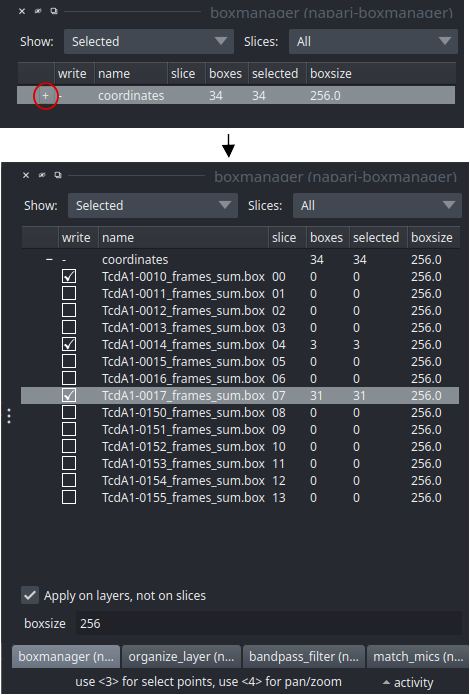
Switch to the boxmanager tab. Open the list of coordinates by pressing the little +. You can now navigate in the image tree and start picking.
Start picking particles
The basic usage of the boxmanager is as follows:
Place a box: Switch the layer control (left side) to
 (shortcut key 2). Then you can place a box with LMB (Left mouse button).
Move a box: Switch to the layer control to
 (shortcut key 3). Then you can drag a box by holding LMB.
Delete a box: Switch the layer control to
. Click on a box and press DELZoom: You can use your mouse wheel to zoom in and out.
You can change the box size in the main window, by changing the number in the text field boxsize and confirm with pressing Enter. For picking, you should the use minimum sized square which encloses your particle.
If you have images that do not contain particles but only contamination / ice you can add them to your training set by activate the checkbox in front of the image.
Save your annotations to disk
If you finished picking from your micrographs, you can export your box files in tab organize_layer. The defaults should be fine so you can directly press Save to dir. Training data is created for all micrographs that have an activated checkbox. Create a new directory called train_annotation and save it there. Close boxmanager.
Optionally, you now create a third folder with the name train_image. Now for each box file, copy the corresponding
image from images into train_image.
Note
While it is nice to keep your files organized, you don’t have to copy your training images into a separate folder. In the configuration file (see below) you can also simply specify the images directory as train_image_folder. CrYOLO will find the correct images using the box files.
crYOLO will detect image / box file pairs by taking the box file and searching for an image filename which contains the box filename.
2. Start crYOLO
You can use crYOLO either by command line or by using the GUI. The GUI should be easier for most users. You can start it with:
cryolo_gui.py
The crYOLO GUI is essentially a visualization of the command line interface. On left side, you find all possible “Actions”:
config: With this action you create the configuration file that you need to run crYOLO.
train: This action lets you train crYOLO from scratch or refine an existing model.
predict: If you have a (pre)trained model you can pick particles in your data set using this command.
evaluation: This action helps you to quantify the quality of your model.
boxmanager: This action starts the cryolo boxmanager. You can visualize the picked particles with it or create training data.
Each action has several parameters which are organized in tabs. Once you have chosen your settings you can press Start (just as example, don’t press it now ;-)), the command will be applied and crYOLO shows you the output:
It will tell you if something went wrong. Moreover, it will tell you all parameters used. Pressing Back brings you back to your settings, where you can either edit the settings (in case something went wrong) or go to the next action.
3. Configuration
You now have to create a configuration file for your picking project. It contains all important constants and paths and helps you to reproduce your results later on.
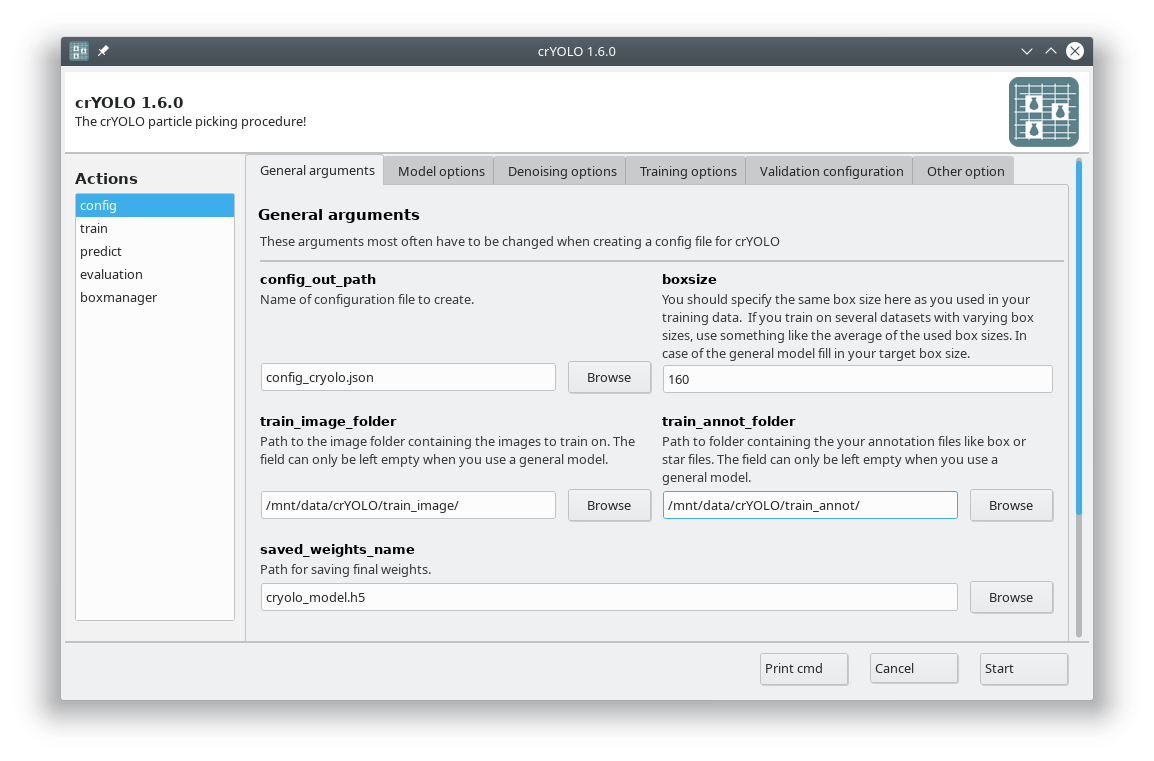
You can either use the command line to create the configuration file or the GUI. For most users, the GUI should be easier. Select the config action and fill in the general fields:
At this point you could already press Start to generate the config file but you might want to take these options into account:
During training, crYOLO also needs validation data. Typically, 20% of the training data are randomly chosen as validation data. If you want to use specific images as validation data, you can move the images and the corresponding box files to separate folders. Make sure that they are removed from the original training folder! You can then specify the new validation folders in “Validation configuration” tab.
By default, your micrographs are low pass filtered to an absolute frequency of 0.1 and saved to disk. You can change the cutoff threshold and the directory for filtered micrographs in the “Denoising options” tab.
When training from scratch, crYOLO is initialized with weights learned on the ImageNet training data (transfer learning). However, it might improve the training if you set the pretrained_weights options in the “Training options” tab to the current general model. Please note, doing this you don’t fine tune the network, you just change the initial model initialization.
Alternative: Using neural-network denoising with JANNI
You can also use neural network denoising with JANNI. The easiest way is to use the JANNI’s general model (Download here) but you can also train JANNI for your data. crYOLO directly uses an interface to JANNI to filter your data, you just have to change the filter argument in the Denoising tab from LOWPASS to JANNI and specify the path to your JANNI model:
I recommend to use denoising with JANNI only together with a GPU as it is rather slow (~ 1-2 seconds per micrograph on the GPU and 10 seconds per micrograph on the CPU)
Editing the configuration file
You can also modify all options and parameters directly in the config.json file. It can be opened by any text editor. Please note the wiki entry about the crYOLO configuration file if you want to know more details.
Hint
Alternative: Create the configuration file with the command line
To create a basic configuration file that will work for most projects is very simple. I assume
your box files for training are in the folder train_annot and the corresponding images in
train_image. I furthermore assume that your box size in your box files is 160. To create the config
config_cryolo.json simply run:
cryolo_gui.py config config_cryolo.json 160 --train_image_folder train_image --train_annot_folder train_annot
To get a full description of all available options type:
cryolo_gui.py config -h
If you want to specify separate validation folders you can use the --valid_image_folder and --valid_annot_folder options:
cryolo_gui.py config config_cryolo.json 160 --train_image_folder train_image --train_annot_folder train_annot --valid_image_folder valid_img --valid_annot_folder valid_annot
4. Training
Now you are ready to train the model. In case you have multiple GPUs, you should first select a free GPU. The following command will show the status of all GPUs:
nvidia-smi
For this tutorial, we assume that you have either a single GPU or want to use GPU 0.
Use a different or multiple GPUs
In the Optional arguments tab you can change the GPU that should be used by crYOLO. If you have multiple GPUs (e.g. nvidia-smi lists GPU 0 and GPU 1) you can also use both by setting the GPU argument to ‘0 1’.
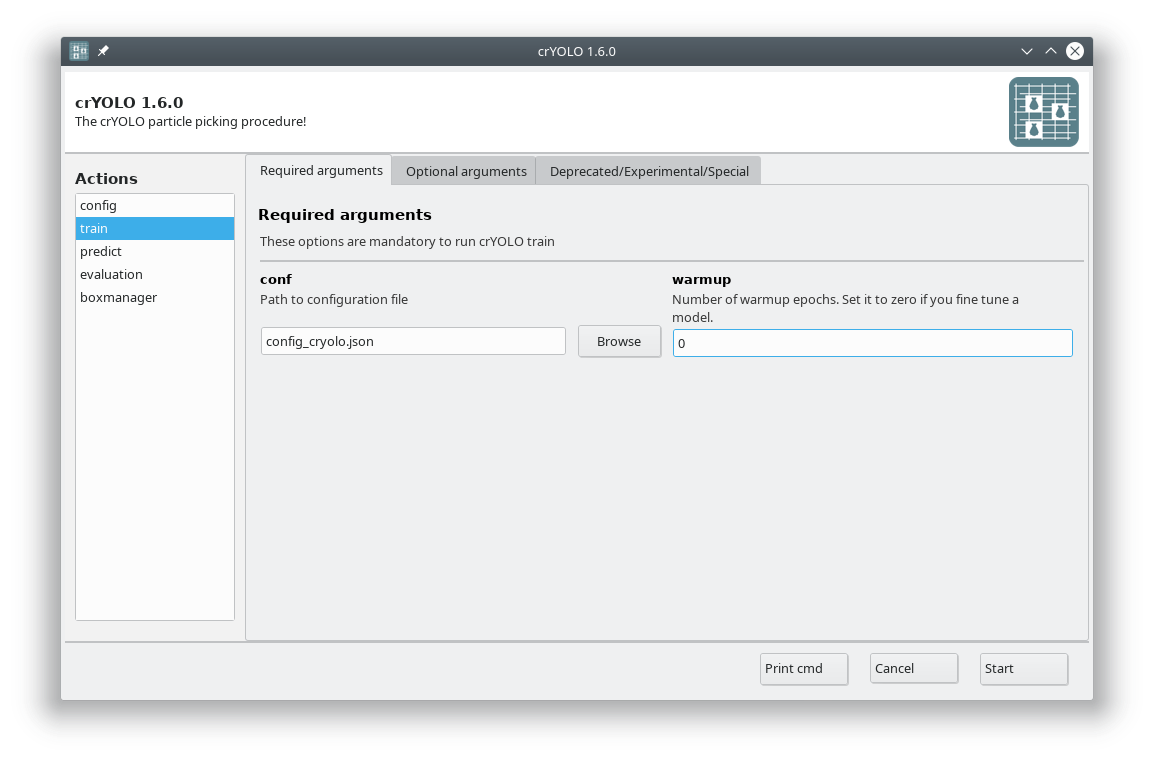
In the GUI you have to fill in the mandatory fields:
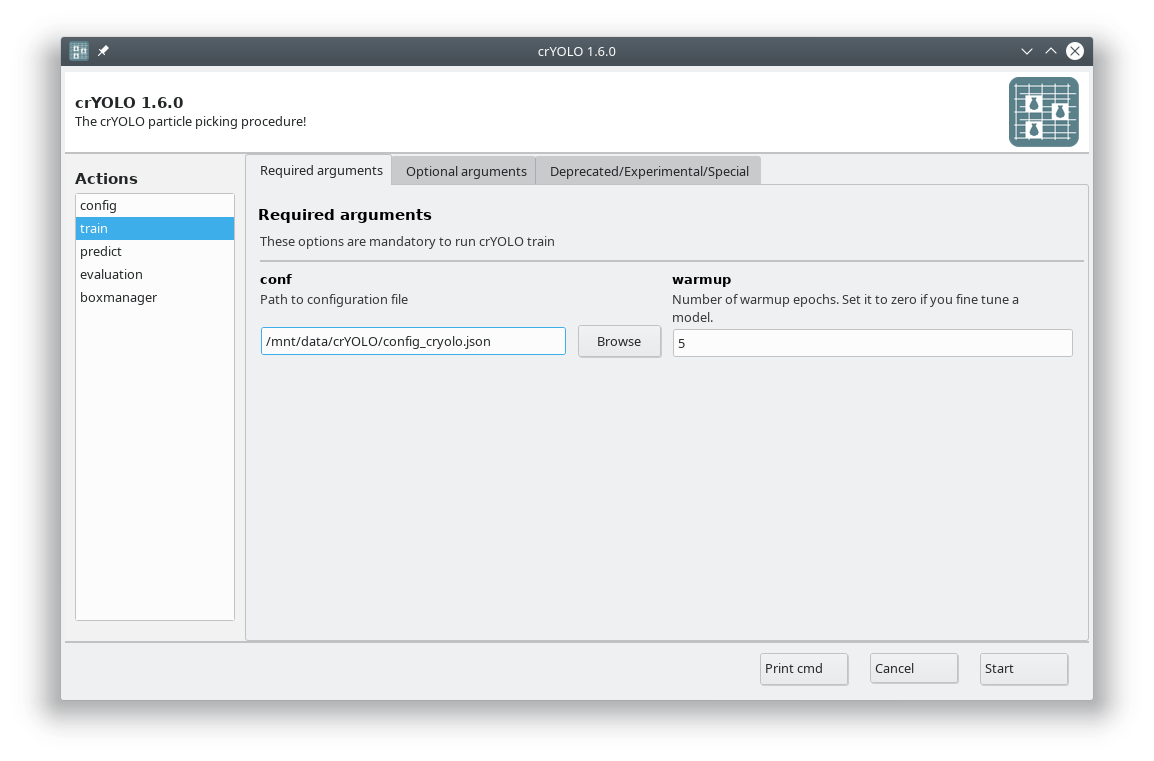
The default number of warmup epochs is fine as long as you don’t want to refine an existing model. During the warmup training epochs it will not try to estimate the size of your particle, which helps crYOLO to converge.
When does crYOLO stop the training?
When you start the training, it will stop when the “loss” metric on the validation data does not improve 10 times in a row. This is typically enough. In case you want to give the training more time to find the best model you can increase the “not changed in a row” parameter to a higher value by setting the early argument in the Optional arguments to, for example, 15.
The final model will be written to disk as specified in saved_weights_name in your configuration file.
Now press the Start button to start the training on the local machine or the Submit button to submit the job to a queueing system
Hint
Alternative: Train crYOLO using the command line
To run the training on GPU 0 with 5 warmup-epochs and an early stop of 15 navigate to the folder with config_cryolo.json file, train_image folder etc.
cryolo_train.py -c config_cryolo.json -w 5 -g 0 -e 15
The final model file will be written to disk.
5. Picking
Select the action predict and fill all arguments in the Required arguments tab:
Adjusting confidence threshold
In crYOLO, all particles have an assigned confidence value. By default, all particles with a confidence value below 0.3 are discarded. If you want to pick less or more conservatively you might want to change this confidence threshold to a less (e.g. 0.2) or more (e.g. 0.4) conservative value in the Optional arguments tab. However, it is much easier to select the best threshold after picking using the CBOX files written by crYOLO as described in the next section.
crYOLO on cluster machines
Cluster machines typically use parallel filesystem, which allow the parallel reading of files.
In these cases you should use more processes as cpu cores available. In GUI the you can find num_cpu under Optional arguments.
On our cluster we oversubscribe a node (4 cores) by factor of 7 by setting num_cpu to 32. In the command line you can do that by using
the option --num_cpu NUMBER_OF_PROCESSES.
Monitor mode
When this option is activated, crYOLO will monitor your input folder. This especially useful
for automation purposes. You can stop the monitor mode by writing an empty file with the
name stop.cryolo in the input directory. Just add --monitor in the command line or check
the monitor box in in the Optional arguments tab
Press the the Start button to run the prediction. You can also press the Submit button to submit the job to a queueing system
After picking is done, you can find four folders in your specified output folder:
CBOX: Contains a coordinate file in .cbox format each input micrograph. It contains all detected particles, even those with a confidence lower the selected confidence threshold. Additionally it contains the confidence and the estimated diameter for each particle. Importing those files into the boxmanager allows you advanced filtering e.g. according size or confidence.EMAN: Contains a coordinate file in .box format each input micrograph. Only particles with the an confidence higher then the selected (default: 0.3) are contained in those files.STAR: Contains a coordinate file in .star format each input micrograph. Only particles with the an confidence higher then the selected (default: 0.3) are contained in those files.DISTR: Contains the plots of confidence- and size-distribution. Moreover, it contains a machine readable text-file the summary statistics about these distributions and their raw data in separate text-files.
Hint
Import coordinates into Relion 4
To import your coordinates into Relion 4 a few additional steps are necessary. You find a tutorial how to do that in the “Other pages” section.
Hint
Alternative: Run prediction from the command line
To pick all your images in the directory full_data with the model weight file cryolo_model.h5 (e.g. or gmodel_phosnet_X_Y.h5 when using the general model) and and a confidence threshold of 0.3 run:
cryolo_predict.py -c config.json -w cryolo_model.h5 -i full_data/ -g 0 -o boxfiles/ -t 0.3
You will find the picked particles in the directory boxfiles.
6. Visualize the results
To visualize your results you can use the boxmanager:
As image_dir you select the full_data directory. As box_dir you select the CBOX folder (or CBOX_FILAMENT_SEGMENTED in case of filaments).
Hint
Alternative: Open it via command line
You can also open the results via command line:
napari_boxmanager 'full_data/*.mrc' 'boxfiles/CBOX/*.cbox'
CBOX files contain besides the particle coordinates more information like the confidence and the estimated size of each particle. When importing .cbox files into the box manager, it enables more filtering options in the GUI. You can plot size- and confidence distributions. Moreover, you can change the confidence threshold, minimum and maximum size and see the results in a live preview. If you are done with the filtering, you can then write the new box selection into new box files.
7. Evaluate your results
The evaluation tool allows you, based on your validation micrographs, to get statistics about the success of your training.
To understand the outcome, you have to know what precision and recall is. Here is good figure from wikipedia:
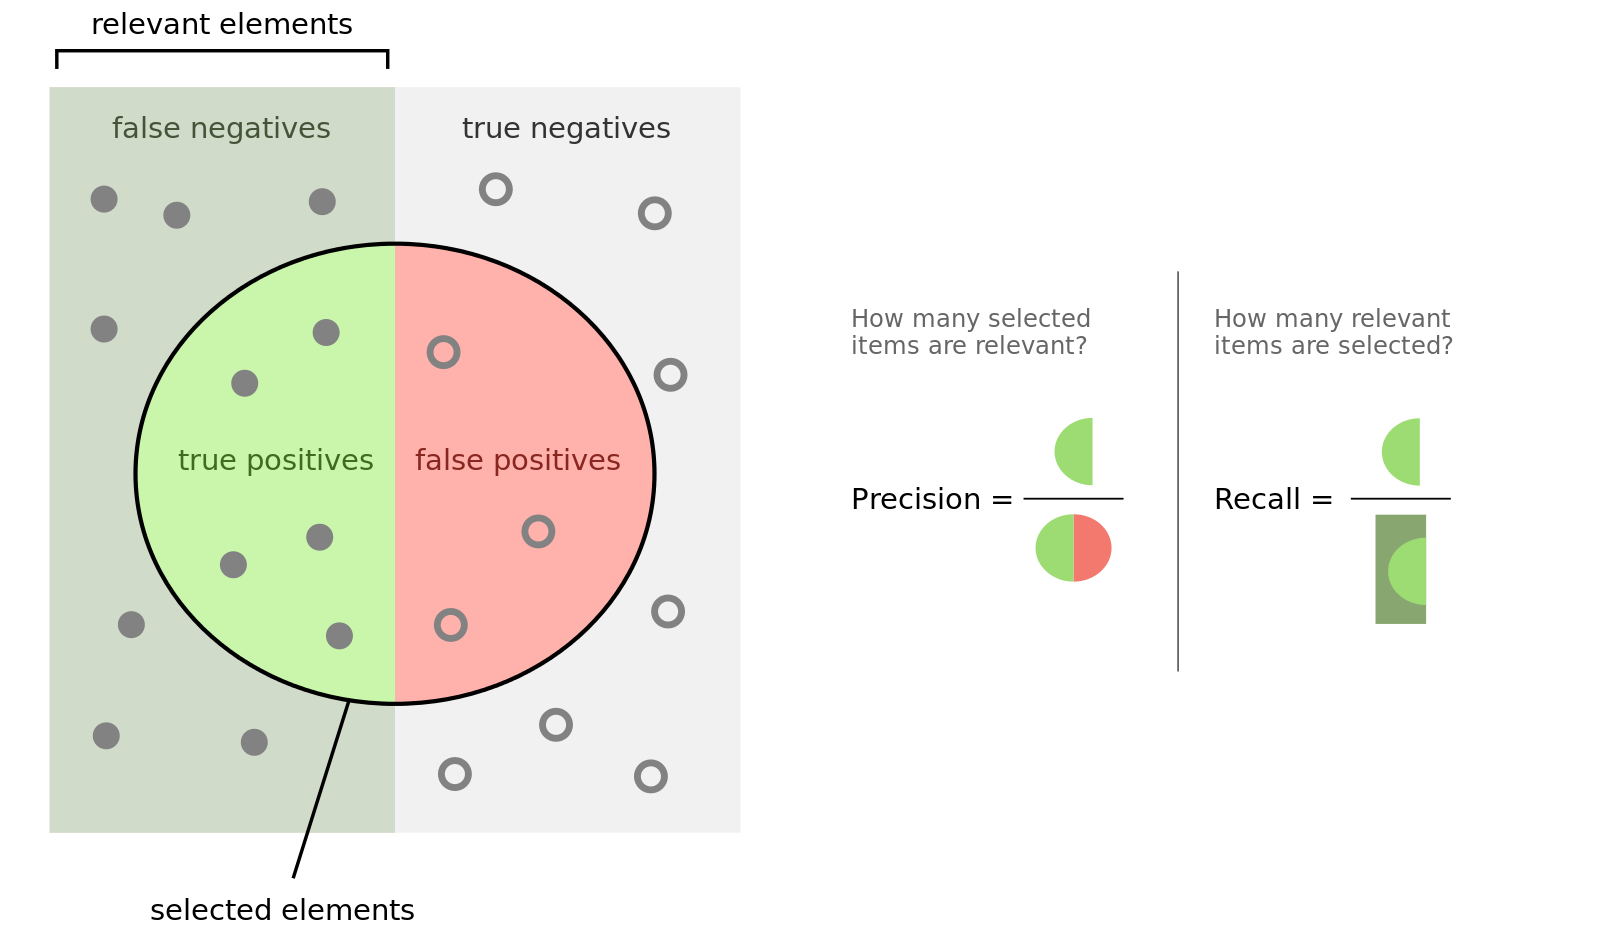
Another important measure is the F1 (\(\beta = 1\)) and F2 (\(\beta = 2\)) score:
Warning
Precision metric can be misleading
If your validation micrographs are not labeled to completion the precision value will be misleading. crYOLO will start picking the remaining ‘unlabeled’ particles, but for statistics they are counted as false-positive (as the software takes your labeled data as ground truth).
If you followed the tutorial, the validation data are selected randomly. A run file for each training
is created and saved into the folder logs/runfiles in your project directory. These runfiles
are .json files containing information about what micrographs were selected for validation.
To calculate evaluation metrics select the evaluation action.
Fill out the fields in the Required arguments tab:
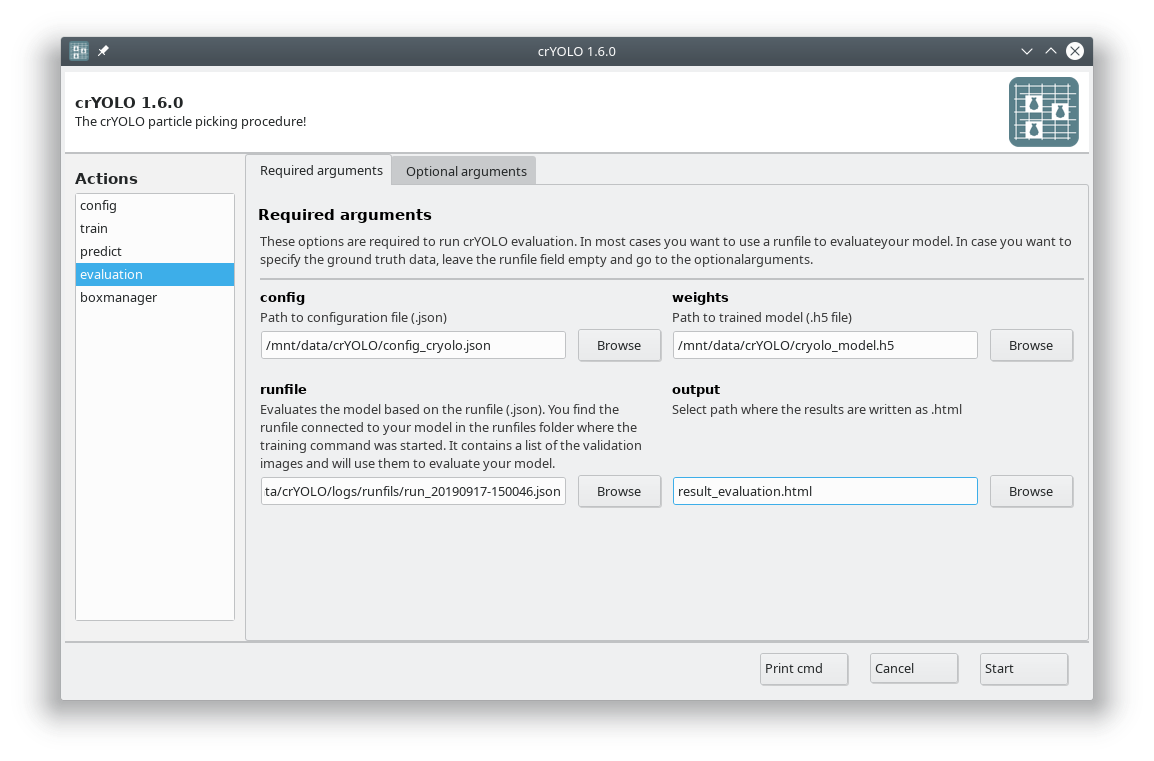
Press Start to calculate the evaluation results.
Hint
Alternative: Run evaluation from the command line
cryolo_evaluation.py -c config.json -w model.h5 -r runfiles/run_YearMonthDay-HourMinuteSecond.json -g 0
The html file you specified as output looks like this:
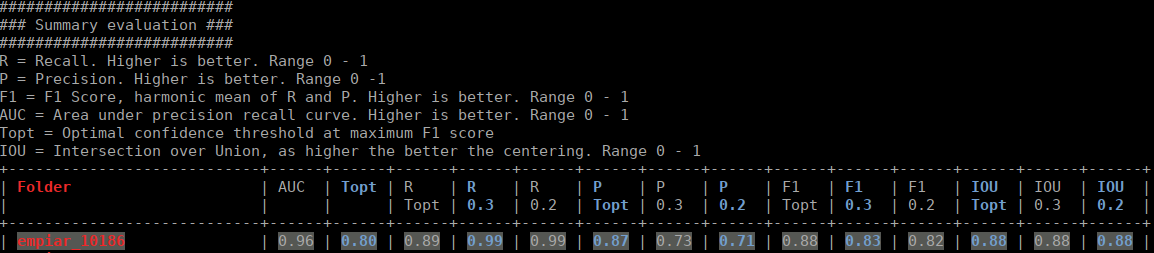
The table contains several statistics:
AUC: Area under curve of the precision-recall curve. Overall summary statistics. Perfect classifier = 1, Worst classifier = 0
Topt: Optimal confidence threshold with respect to the F1 score. It might not be ideal for your picking, as the F1 score weighs recall and precision equally. In single particle analysis, recall is often more important than the precision.
R (Topt): Recall using the optimal confidence threshold.
R (0.3): Recall using a confidence threshold of 0.3.
R (0.2): Recall using a confidence threshold of 0.2.
P (Topt): Precision using the optimal confidence threshold.
P (0.3): Precision using a confidence threshold of 0.3.
P (0.2): Precision using a confidence threshold of 0.2.
F1 (Topt): Harmonic mean of precision and recall using the optimal confidence threshold.
F1 (0.3): Harmonic mean of precision and recall using a confidence threshold of 0.3.
F1 (0.2): Harmonic mean of precision and recall using a confidence threshold of 0.2.
IOU (Topt): Intersection over union of the auto-picked particles and the corresponding ground-truth boxes. The higher, the better – evaluated with the optimal confidence threshold.
IOU (0.3): Intersection over union of the auto-picked particles and the corresponding ground-truth boxes. The higher, the better – evaluated with a confidence threshold of 0.3.
IOU (0.2): Intersection over union of the auto-picked particles and the corresponding ground-truth boxes. The higher, the better – evaluated with a confidence threshold of 0.2.
If the training data consist of multiple folders, then evaluation will be done for each folder separately. Furthermore, crYOLO estimates the optimal picking threshold regarding the F1 Score and F2 Score. Both are basically average values of the recall and prediction, whereas the F2 score puts more weights on the recall, which is in cryo-EM often more important.
Tutorial 3: Pick filaments using a model trained for your data
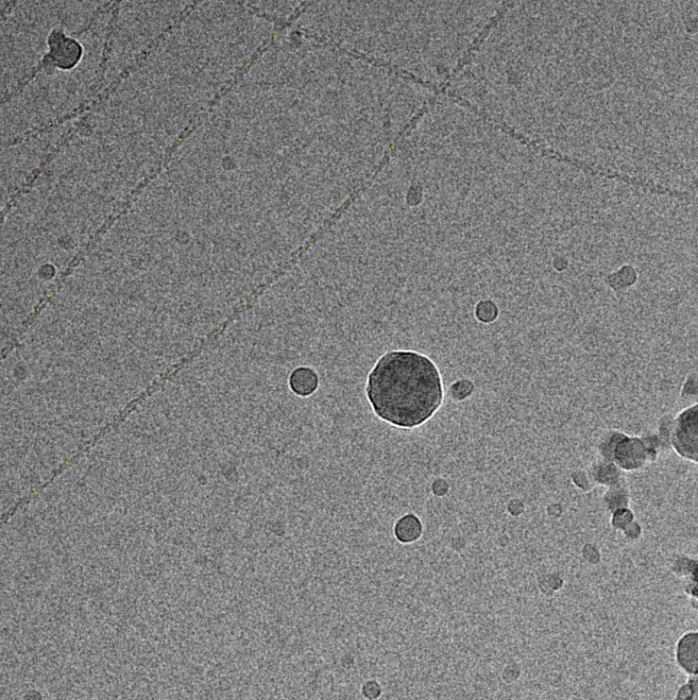
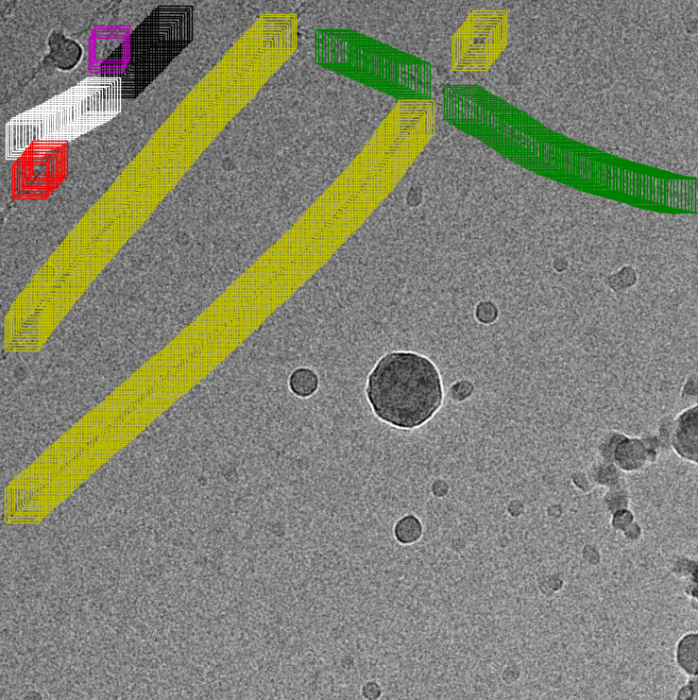
When picking filaments, it is important to identify each filament individually. This allows specific spacing of the boxes (i.e., the helical rise) to maximize the number of particles. CrYOLO supports this method of picking filaments.
Filament mode on actin:
|
|
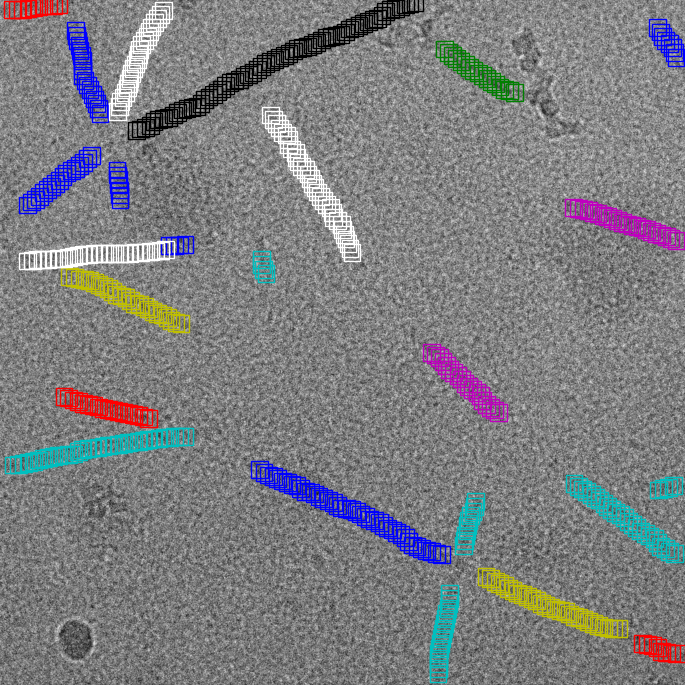
Filament mode on MAVS (EMPIAR-10031) :

|
|
1. Data preparation
In the following I will assume that your image data is in the folder images.
The next step is to create training data. To do so, we have to pick manually in several images. Ideally, the images are picked to completion. However, it is not necessary to pick all particles. crYOLO will still converge if you miss some (or even many).
How many images have to be picked?
It depends! Typically 10 images are a good start. However, that number may increase / decrease due to several factors:
A very heterogeneous background could make it necessary to pick more images.
When you refine a general model, you might need to pick fewer images.
If your micrograph is only sparsely decorated, you may need to pick more images.
We recommend that you start with 10 images, then autopick your data, check the results and finally decide whether to add more micrographs to your training set. If you refine a general model, even 5 images might be enough.
To create your training data, we developed a dedicated napari plugin called “napari-boxmanager”.
Start the box manager with the following command:
napari_boxmanager
Now press File -> Open Folder… and the select the images directory.
Increase the contrast
You might want to run a low pass filter before you start picking to get better contrast.
Switch to tab bandpass_filter and check if the default LP resolution is ok and that the extracted Pixel size is correct.
Press Run to get a new layer with your low pass filtered images. It will filter the images on-the-fly.
How to pick filaments:
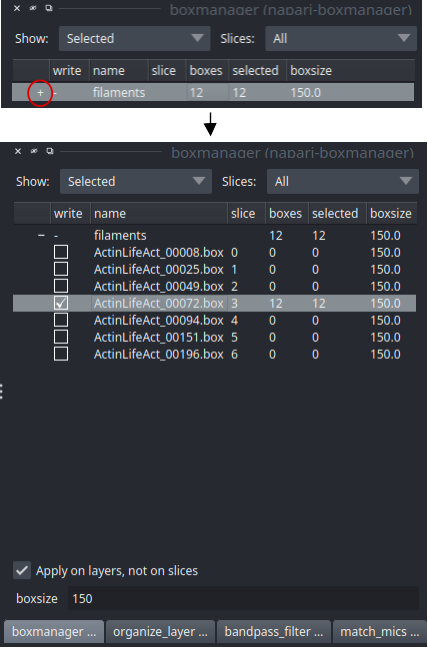
First you need to create a new layer for picking filaments. Switch to the tab Organize_layer and click Create filament layer. I assume that you only have one image stack open, in case you don’t please adapt Target image layer accordingly. Switch to the boxmanager tab. Open the list of coordinates by pressing the little +.
The filaments are placed as follows:
Place a filament: Switch to layer control to
 . Click with LMB at the start of the filament. You can click along the filament. Double click to end the picking of filament.
Remove filament: Switch to layer control to
(shortcut key 5). Click on your filament and press DEL.
You can change the box width in the main window, by changing the number in the text field boxsize. Press Enter to apply it to all picked filaments. For training crYOLO, you should the use a box width ~2x bigger than your filament width.
If you have images that do not contain filaments but only contamination / ice you can add them to your training set by activate the checkbox in front of the image.
Save your training data
If you finished picking, you can export your box files in the tab organize_layer. You can keep the default values. Press Save to dir, create a folder boxes and save your box files into it.
2. Start crYOLO
You can use crYOLO either by command line or by using the GUI. The GUI should be easier for most users. You can start it with:
cryolo_gui.py
The crYOLO GUI is essentially a visualization of the command line interface. On left side, you find all possible “Actions”:
config: With this action you create the configuration file that you need to run crYOLO.
train: This action lets you train crYOLO from scratch or refine an existing model.
predict: If you have a (pre)trained model you can pick particles in your data set using this command.
evaluation: This action helps you to quantify the quality of your model.
boxmanager: This action starts the cryolo boxmanager. You can visualize the picked particles with it or create training data.
Each action has several parameters which are organized in tabs. Once you have chosen your settings you can press Start (just as example, don’t press it now ;-)), the command will be applied and crYOLO shows you the output:
It will tell you if something went wrong. Moreover, it will tell you all parameters used. Pressing Back brings you back to your settings, where you can either edit the settings (in case something went wrong) or go to the next action.
3. Configuration
You now have to create a configuration file for your picking project. It contains all important constants and paths and helps you to reproduce your results later on.
You can either use the command line to create the configuration file or the GUI. For most users, the GUI should be easier. Select the config action and fill in the general fields:
As train_annot_folder you can either choose CBOX_FILAMENT or the EMAN_HELICON folder within the BOXES folder that you created in the previous section.
As train_image_folder you can choose the same folder that you’ve used during creation of your training data.
At this point you could already press Start to generate the config file but you might want to take these options into account:
During training, crYOLO also needs validation data. Typically, 20% of the training data are randomly chosen as validation data. If you want to use specific images as validation data, you can move the images and the corresponding box files to separate folders. Make sure that they are removed from the original training folder! You can then specify the new validation folders in “Validation configuration” tab.
By default, your micrographs are low pass filtered to an absolute frequency of 0.1 and saved to disk. You can change the cutoff threshold and the directory for filtered micrographs in the “Denoising options” tab.
When training from scratch, crYOLO is initialized with weights learned on the ImageNet training data (transfer learning). However, it might improve the training if you set the pretrained_weights options in the “Training options” tab to the current general model. Please note, doing this you don’t fine tune the network, you just change the initial model initialization.
Alternative: Using neural-network denoising with JANNI
You can also use neural network denoising with JANNI. The easiest way is to use the JANNI’s general model (Download here) but you can also train JANNI for your data. crYOLO directly uses an interface to JANNI to filter your data, you just have to change the filter argument in the Denoising tab from LOWPASS to JANNI and specify the path to your JANNI model:
I recommend to use denoising with JANNI only together with a GPU as it is rather slow (~ 1-2 seconds per micrograph on the GPU and 10 seconds per micrograph on the CPU)
Editing the configuration file
You can also modify all options and parameters directly in the config.json file. It can be opened by any text editor. Please note the wiki entry about the crYOLO configuration file if you want to know more details.
Hint
Alternative: Create the configuration file with the command line
To create a basic configuration file that will work for most projects is very simple. I assume
your box files for training are in the folder train_annot and the corresponding images in
train_image. I furthermore assume that your box size in your box files is 160. To create the config
config_cryolo.json simply run:
cryolo_gui.py config config_cryolo.json 160 --train_image_folder train_image --train_annot_folder train_annot
To get a full description of all available options type:
cryolo_gui.py config -h
If you want to specify separate validation folders you can use the --valid_image_folder and --valid_annot_folder options:
cryolo_gui.py config config_cryolo.json 160 --train_image_folder train_image --train_annot_folder train_annot --valid_image_folder valid_img --valid_annot_folder valid_annot
4. Training
Now you are ready to train the model. In case you have multiple GPUs, you should first select a free GPU. The following command will show the status of all GPUs:
nvidia-smi
For this tutorial, we assume that you have either a single GPU or want to use GPU 0.
Use a different or multiple GPUs
In the Optional arguments tab you can change the GPU that should be used by crYOLO. If you have multiple GPUs (e.g. nvidia-smi lists GPU 0 and GPU 1) you can also use both by setting the GPU argument to ‘0 1’.
In the GUI you have to fill in the mandatory fields:
The default number of warmup epochs is fine as long as you don’t want to refine an existing model. During the warmup training epochs it will not try to estimate the size of your particle, which helps crYOLO to converge.
When does crYOLO stop the training?
When you start the training, it will stop when the “loss” metric on the validation data does not improve 10 times in a row. This is typically enough. In case you want to give the training more time to find the best model you can increase the “not changed in a row” parameter to a higher value by setting the early argument in the Optional arguments to, for example, 15.
For learning the directions of the filaments and in general the filament mode needs more time compared to single particles. Therefore we recommend to set the early argument in the Optional arguments to 15.
The final model will be written to disk as specified in saved_weights_name in your configuration file.
Now press the Start button to start the training on the local machine or the Submit button to submit the job to a queueing system
Hint
Alternative: Train crYOLO using the command line
To run the training on GPU 0 with 5 warmup-epochs and an early stop of 15 navigate to the folder with config_cryolo.json file, train_image folder etc.
cryolo_train.py -c config_cryolo.json -w 5 -g 0 -e 15
The final model file will be written to disk.
5. Picking
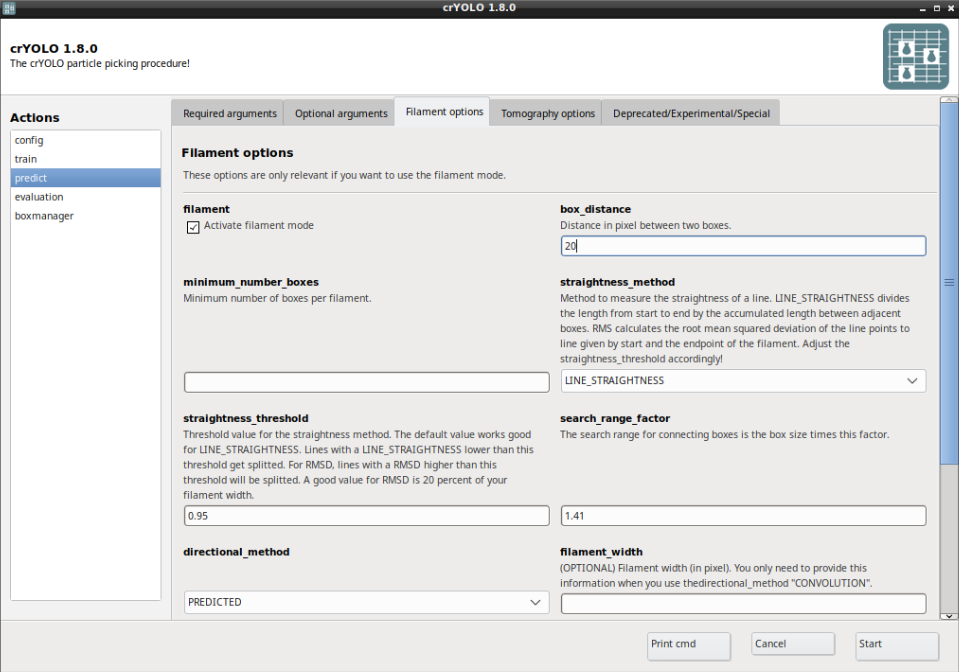
Select the action predict and fill all arguments in the Required arguments tab:
Now select the Filament options tab and check Activate filament mode and define the box_distance (e.g. 20 for 90% overlap when using a box size if 200).
directional_method
To trace the filaments in 2D, the local direction of the filament has to be estimated. There are two methods available:
With PREDICTED you use the predicted direction learned by crYOLO. This is the recommended method.
With CONVOLUTION an elliposid mask with the width given by filament_width is rotated and convolved with the input image. The direction with the highest response gives the local direction of the filament. This method is mainly for backwards compatibility with earlier crYOLO versions (< 1.8).
The directory output_boxes will be created and all results are saved there. The traced
filaments will be saved in the eman2 helix format with particle coordinates. But also EMAN2 and STAR start/end coordinates.
Import into Relion
You can find a detailed description how to import crYOLO filament coordinates into Relion here.
Press the Start button to start the picking.
Hint
Evaluate directional estimates
You can check how well crYOLO did in estimating the directionality, which is crucial for the subsequent filament tracing. To do this for a given threshold (e.g. 0.3), you can run
cryolo_boxmanager_tools.py cbox_directions -m full_data/ -c output_boxes/CBOX/ -t 0.3 -o output_boxes/directions/
You will find a png plot for each micrograph in output_boxes/directions/ after the script has finished.
Hint
Alternative: Run prediction in command line
Let’s assume you want to pick a filament, the box size
is 200×200 and you want a 90% overlap (-bd 20). Moreover, you wish that each filament has at
least 6 boxes (-mn 6). The micrographs are in the full_data directory. Than the picking
command would be:
cryolo_predict.py -c config_cryolo.json -w cryolo_model.h5 -i full_data --filament -bd 20 -o boxes/ -g 0 -mn 6
6. Visualize the results
To visualize your results you can use the boxmanager:
As image_dir you select the full_data directory. As box_dir you select the CBOX folder (or CBOX_FILAMENT_SEGMENTED in case of filaments).
Hint
Alternative: Open it via command line
You can also open the results via command line:
napari_boxmanager 'full_data/*.mrc' 'boxfiles/CBOX/*.cbox'
CBOX files contain besides the particle coordinates more information like the confidence and the estimated size of each particle. When importing .cbox files into the box manager, it enables more filtering options in the GUI. You can plot size- and confidence distributions. Moreover, you can change the confidence threshold, minimum and maximum size and see the results in a live preview. If you are done with the filtering, you can then write the new box selection into new box files.
Tutorial 4: Pick particles using the general model refined for your data
With crYOLO you can train a model for your data by fine-tuning the general model.
What does fine-tuning mean?
The general model was trained on a lot of particles with a variety of shapes and therefore learned a robust set of generic features. The last layers, however, learn a fairly abstract representation of the particles and it might be that they do not perfectly fit your particle at hand. In order to adapt this abstract representation within the network to your specific particle, fine-tuning only affects the last convolutional layers, but keeps all others fixed.
Why should I fine-tune my model instead of training from scratch?
From theory, using fine-tuning should reduce the risk of overfitting and the amount of the required training data.
The training is much faster, as not all layers have to be trained.
The training will need less GPU memory and therefore is usable with NVIDIA cards with less memory.
Overfitting
Overfitting means, that the model works good on the training micrographs, but not on new unseen micrographs. The model just memorized what it saw instead of learning generic features.
Warning
The fine tune mode is still somewhat experimental and we will update this section as crYOLO develops over time.
If you followed the installation instructions, you now have to activate the cryolo virtual environment with
source activate cryolo
1. Data preparation
In the following I will assume that your image data is in the folder images.
The next step is to create training data. To do so, we have to pick manually in several images. Ideally, the images are picked to completion. However, it is not necessary to pick all particles. crYOLO will still converge if you miss some (or even many).
How many images have to be picked?
It depends! Typically 10 images are a good start. However, that number may increase / decrease due to several factors:
A very heterogeneous background could make it necessary to pick more images.
When you refine a general model, you might need to pick fewer images.
If your micrograph is only sparsely decorated, you may need to pick more images.
We recommend that you start with 10 images, then autopick your data, check the results and finally decide whether to add more micrographs to your training set. If you refine a general model, even 5 images might be enough.
To create your training data, we developed a dedicated napari plugin called “napari-boxmanager”.
Start the box manager with the following command:
napari_boxmanager
Now press File -> Open Folder and the select the images directory.
Increase the contrast
You might want to run a low pass filter before you start picking to get better contrast.
Switch to tab bandpass_filter and check if the default LP resolution is ok and that the extracted Pixel size is correct.
Press Run to get a new layer with your low pass filtered images. It will filter the images on-the-fly.
Create particle layer
First you need to create a new layer for picking particles
Switch to the tab Organize_layer.
Click Create particle layer. I assume that you only have one image stack open, in case you don’t please adapt Target image layer accordingly.
Switch to the boxmanager tab. Open the list of coordinates by pressing the little +. You can now navigate in the image tree and start picking.
Start picking particles
The basic usage of the boxmanager is as follows:
Place a box: Switch the layer control (left side) to
(shortcut key 2). Then you can place a box with LMB (Left mouse button).Move a box: Switch to the layer control to
(shortcut key 3). Then you can drag a box by holding LMB.Delete a box: Switch the layer control to
. Click on a box and press DELZoom: You can use your mouse wheel to zoom in and out.
You can change the box size in the main window, by changing the number in the text field boxsize and confirm with pressing Enter. For picking, you should the use minimum sized square which encloses your particle.
If you have images that do not contain particles but only contamination / ice you can add them to your training set by activate the checkbox in front of the image.
Save your annotations to disk
If you finished picking from your micrographs, you can export your box files in tab organize_layer. The defaults should be fine so you can directly press Save to dir. Training data is created for all micrographs that have an activated checkbox. Create a new directory called train_annotation and save it there. Close boxmanager.
Optionally, you now create a third folder with the name train_image. Now for each box file, copy the corresponding
image from images into train_image.
Note
While it is nice to keep your files organized, you don’t have to copy your training images into a separate folder. In the configuration file (see below) you can also simply specify the images directory as train_image_folder. CrYOLO will find the correct images using the box files.
crYOLO will detect image / box file pairs by taking the box file and searching for an image filename which contains the box filename.
2. Start crYOLO
You can use crYOLO either by command line or by using the GUI. The GUI should be easier for most users. You can start it with:
cryolo_gui.py
The crYOLO GUI is essentially a visualization of the command line interface. On left side, you find all possible “Actions”:
config: With this action you create the configuration file that you need to run crYOLO.
train: This action lets you train crYOLO from scratch or refine an existing model.
predict: If you have a (pre)trained model you can pick particles in your data set using this command.
evaluation: This action helps you to quantify the quality of your model.
boxmanager: This action starts the cryolo boxmanager. You can visualize the picked particles with it or create training data.
Each action has several parameters which are organized in tabs. Once you have chosen your settings you can press Start (just as example, don’t press it now ;-)), the command will be applied and crYOLO shows you the output:
It will tell you if something went wrong. Moreover, it will tell you all parameters used. Pressing Back brings you back to your settings, where you can either edit the settings (in case something went wrong) or go to the next action.
3. Configuration
You now have to create a configuration file for your picking project. It contains all important constants and paths and helps you to reproduce your results later on.
You can either use the command line to create the configuration file or the GUI. For most users, the GUI should be easier. Select the config action and fill in the general fields:
At this point you could already press Start to generate the config file but you might want to take these options into account:
During training, crYOLO also needs validation data. Typically, 20% of the training data are randomly chosen as validation data. If you want to use specific images as validation data, you can move the images and the corresponding box files to separate folders. Make sure that they are removed from the original training folder! You can then specify the new validation folders in “Validation configuration” tab.
By default, your micrographs are low pass filtered to an absolute frequency of 0.1 and saved to disk. You can change the cutoff threshold and the directory for filtered micrographs in the “Denoising options” tab.
When training from scratch, crYOLO is initialized with weights learned on the ImageNet training data (transfer learning). However, it might improve the training if you set the pretrained_weights options in the “Training options” tab to the current general model. Please note, doing this you don’t fine tune the network, you just change the initial model initialization.
Alternative: Using neural-network denoising with JANNI
You can also use neural network denoising with JANNI. The easiest way is to use the JANNI’s general model (Download here) but you can also train JANNI for your data. crYOLO directly uses an interface to JANNI to filter your data, you just have to change the filter argument in the Denoising tab from LOWPASS to JANNI and specify the path to your JANNI model:
I recommend to use denoising with JANNI only together with a GPU as it is rather slow (~ 1-2 seconds per micrograph on the GPU and 10 seconds per micrograph on the CPU)
Editing the configuration file
You can also modify all options and parameters directly in the config.json file. It can be opened by any text editor. Please note the wiki entry about the crYOLO configuration file if you want to know more details.
Hint
Alternative: Create the configuration file with the command line
To create a basic configuration file that will work for most projects is very simple. I assume
your box files for training are in the folder train_annot and the corresponding images in
train_image. I furthermore assume that your box size in your box files is 160. To create the config
config_cryolo.json simply run:
cryolo_gui.py config config_cryolo.json 160 --train_image_folder train_image --train_annot_folder train_annot
To get a full description of all available options type:
cryolo_gui.py config -h
If you want to specify separate validation folders you can use the --valid_image_folder and --valid_annot_folder options:
cryolo_gui.py config config_cryolo.json 160 --train_image_folder train_image --train_annot_folder train_annot --valid_image_folder valid_img --valid_annot_folder valid_annot
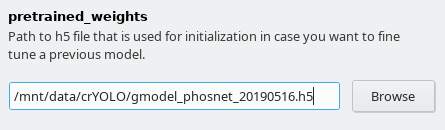
Furthermore, you have to select the model you want to refine. Download the the general model you want to refine specify in the field pretrained_weights in the Training options tab.
4. Training
Now you are ready to train the model. In case you have multiple GPUs, you should first select a free GPU. The following command will show the status of all GPUs:
>>> nvidia-smi
For this tutorial, we assume that you have either a single GPU or want to use GPU 0.
In the GUI choose the action train. In the Required arguments tab select the configuration file we created in the previous step and set the number of warmup periods to zero.
In the Optional arguments tab please check the fine_tune box.
Warning
Adjust the number of layers to train
The number of layers to fine tune (specified by layers_fine_tune in the Optional arguments tab) is still experimental. The default value of 2 worked for us but you might need more layers.
Training on CPU
The fine tune mode is especially useful if you want to train crYOLO on the CPU. On my local machine it reduced the time for training crYOLO on 14 micrographs from 12-15 hours to 4-5 hours.
You can now press the Start button to start training.
5. Picking
Select the action predict and fill all arguments in the Required arguments tab:
Adjusting confidence threshold
In crYOLO, all particles have an assigned confidence value. By default, all particles with a confidence value below 0.3 are discarded. If you want to pick less or more conservatively you might want to change this confidence threshold to a less (e.g. 0.2) or more (e.g. 0.4) conservative value in the Optional arguments tab. However, it is much easier to select the best threshold after picking using the CBOX files written by crYOLO as described in the next section.
crYOLO on cluster machines
Cluster machines typically use parallel filesystem, which allow the parallel reading of files.
In these cases you should use more processes as cpu cores available. In GUI the you can find num_cpu under Optional arguments.
On our cluster we oversubscribe a node (4 cores) by factor of 7 by setting num_cpu to 32. In the command line you can do that by using
the option --num_cpu NUMBER_OF_PROCESSES.
Monitor mode
When this option is activated, crYOLO will monitor your input folder. This especially useful
for automation purposes. You can stop the monitor mode by writing an empty file with the
name stop.cryolo in the input directory. Just add --monitor in the command line or check
the monitor box in in the Optional arguments tab
Press the the Start button to run the prediction. You can also press the Submit button to submit the job to a queueing system
After picking is done, you can find four folders in your specified output folder:
CBOX: Contains a coordinate file in .cbox format each input micrograph. It contains all detected particles, even those with a confidence lower the selected confidence threshold. Additionally it contains the confidence and the estimated diameter for each particle. Importing those files into the boxmanager allows you advanced filtering e.g. according size or confidence.EMAN: Contains a coordinate file in .box format each input micrograph. Only particles with the an confidence higher then the selected (default: 0.3) are contained in those files.STAR: Contains a coordinate file in .star format each input micrograph. Only particles with the an confidence higher then the selected (default: 0.3) are contained in those files.DISTR: Contains the plots of confidence- and size-distribution. Moreover, it contains a machine readable text-file the summary statistics about these distributions and their raw data in separate text-files.
Hint
Import coordinates into Relion 4
To import your coordinates into Relion 4 a few additional steps are necessary. You find a tutorial how to do that in the “Other pages” section.
Hint
Alternative: Run prediction from the command line
To pick all your images in the directory full_data with the model weight file cryolo_model.h5 (e.g. or gmodel_phosnet_X_Y.h5 when using the general model) and and a confidence threshold of 0.3 run:
cryolo_predict.py -c config.json -w cryolo_model.h5 -i full_data/ -g 0 -o boxfiles/ -t 0.3
You will find the picked particles in the directory boxfiles.
6. Visualize the results
To visualize your results you can use the boxmanager:
As image_dir you select the full_data directory. As box_dir you select the CBOX folder (or CBOX_FILAMENT_SEGMENTED in case of filaments).
Hint
Alternative: Open it via command line
You can also open the results via command line:
napari_boxmanager 'full_data/*.mrc' 'boxfiles/CBOX/*.cbox'
CBOX files contain besides the particle coordinates more information like the confidence and the estimated size of each particle. When importing .cbox files into the box manager, it enables more filtering options in the GUI. You can plot size- and confidence distributions. Moreover, you can change the confidence threshold, minimum and maximum size and see the results in a live preview. If you are done with the filtering, you can then write the new box selection into new box files.
7. Evaluate your results
The evaluation tool allows you, based on your validation micrographs, to get statistics about the success of your training.
To understand the outcome, you have to know what precision and recall is. Here is good figure from wikipedia:
Another important measure is the F1 (\(\beta = 1\)) and F2 (\(\beta = 2\)) score:
Warning
Precision metric can be misleading
If your validation micrographs are not labeled to completion the precision value will be misleading. crYOLO will start picking the remaining ‘unlabeled’ particles, but for statistics they are counted as false-positive (as the software takes your labeled data as ground truth).
If you followed the tutorial, the validation data are selected randomly. A run file for each training
is created and saved into the folder logs/runfiles in your project directory. These runfiles
are .json files containing information about what micrographs were selected for validation.
To calculate evaluation metrics select the evaluation action.
Fill out the fields in the Required arguments tab:
Press Start to calculate the evaluation results.
Hint
Alternative: Run evaluation from the command line
cryolo_evaluation.py -c config.json -w model.h5 -r runfiles/run_YearMonthDay-HourMinuteSecond.json -g 0
The html file you specified as output looks like this:
The table contains several statistics:
AUC: Area under curve of the precision-recall curve. Overall summary statistics. Perfect classifier = 1, Worst classifier = 0
Topt: Optimal confidence threshold with respect to the F1 score. It might not be ideal for your picking, as the F1 score weighs recall and precision equally. In single particle analysis, recall is often more important than the precision.
R (Topt): Recall using the optimal confidence threshold.
R (0.3): Recall using a confidence threshold of 0.3.
R (0.2): Recall using a confidence threshold of 0.2.
P (Topt): Precision using the optimal confidence threshold.
P (0.3): Precision using a confidence threshold of 0.3.
P (0.2): Precision using a confidence threshold of 0.2.
F1 (Topt): Harmonic mean of precision and recall using the optimal confidence threshold.
F1 (0.3): Harmonic mean of precision and recall using a confidence threshold of 0.3.
F1 (0.2): Harmonic mean of precision and recall using a confidence threshold of 0.2.
IOU (Topt): Intersection over union of the auto-picked particles and the corresponding ground-truth boxes. The higher, the better – evaluated with the optimal confidence threshold.
IOU (0.3): Intersection over union of the auto-picked particles and the corresponding ground-truth boxes. The higher, the better – evaluated with a confidence threshold of 0.3.
IOU (0.2): Intersection over union of the auto-picked particles and the corresponding ground-truth boxes. The higher, the better – evaluated with a confidence threshold of 0.2.
If the training data consist of multiple folders, then evaluation will be done for each folder separately. Furthermore, crYOLO estimates the optimal picking threshold regarding the F1 Score and F2 Score. Both are basically average values of the recall and prediction, whereas the F2 score puts more weights on the recall, which is in cryo-EM often more important.
Tutorial 5: Pick particles in tomograms
This tutorial explains how to pick particles in a tomogram. Therefore you need to label a couple of slices manually and train cryolo.
If you followed the installation instructions, you now have to activate the cryolo virtual environment with
source activate cryolo
1. Data preparation
In the following I will assume that your image data is in the folder images.
The next step is to create training data. To do so, we have to pick manually in several images. Ideally, the images are picked to completion. However, it is not necessary to pick all particles. crYOLO will still converge if you miss some (or even many).
How many images have to be picked?
It depends! Typically 10 images are a good start. However, that number may increase / decrease due to several factors:
A very heterogeneous background could make it necessary to pick more images.
When you refine a general model, you might need to pick fewer images.
If your micrograph is only sparsely decorated, you may need to pick more images.
We recommend that you start with 10 images, then autopick your data, check the results and finally decide whether to add more micrographs to your training set. If you refine a general model, even 5 images might be enough.
To create your training data, we developed a dedicated napari plugin called “napari-boxmanager”.
Start the box manager with the following command:
napari_boxmanager
For opening your tomograms you have to options:
Single tomogram: Press File -> Open File(s)… and the select one file from the
imagesdirectory.Folder: Press File -> Open Folder… and the select the
imagesdirectory.
Increase the contrast
You might want to run a low pass filter before you start picking to get better contrast.
Switch to tab bandpass_filter and check if the default LP resolution is ok and that the extracted Pixel size is correct.
Press Run to get a new layer with your low pass filtered images. It will filter the images on-the-fly.
Create particle layer
First you need to create a new layer for picking particles
Switch to the tab Organize_layer.
Click Create particle layer. I assume that you only have one image stack open, in case you don’t please adapt Target image layer accordingly.
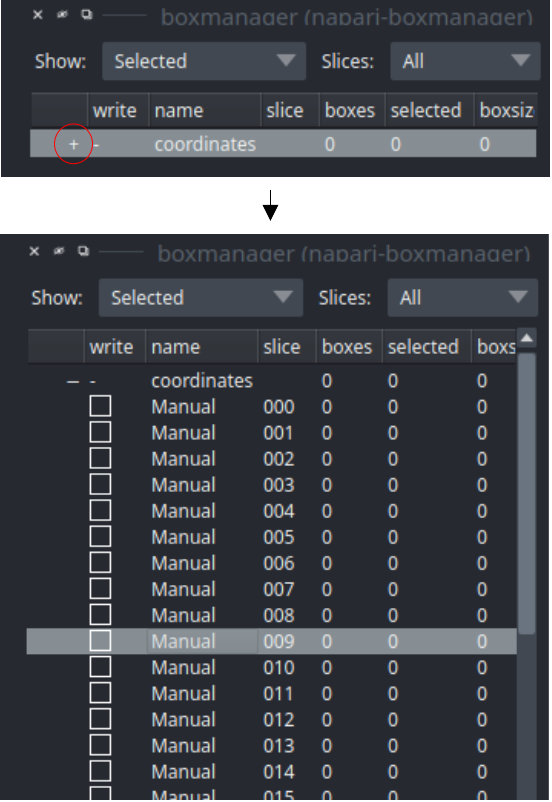
Switch to the boxmanager tab. Open the list of coordinates by pressing the little +. You can now navigate in the image tree and start picking.
Start picking particles
The basic usage of the boxmanager is as follows:
Place a box: Switch the layer control (left side) to
(shortcut key 2). Then you can place a box with LMB (Left mouse button).Move a box: Switch to the layer control to
(shortcut key 3). Then you can drag a box by holding LMB.Delete a box: Switch the layer control to
. Click on a box and press DELZoom: You can use your mouse wheel to zoom in and out.
You can change the box size in the main window, by changing the number in the text field boxsize and confirm with pressing Enter. For picking, you should the use minimum sized square which encloses your particle.
If you have images that do not contain particles but only contamination / ice you can add them to your training set by activate the checkbox in front of the image.
Deactivate out of slice in layer controls (top left).
Note
** Label also not centered particles **
crYOLO is trained on slices. The z-coordinate is only used to identify the relevant slices. To make this clear, its better to deactivate out of slice in layer controls. Otherwise, slices can look completely picked while they are actually not. Label the particles even if the slices do not show the centre of the particle but only a slice of it.
Label your particles in some slices ideally on multiple tomograms. Its important to label them even if the slices do not show the centre of the particle but only slice of it.
If you finished picking from your tomogram, you can export your coordinate files in tab organize_layer. Set the Format to .cbox and press Save to dir. Create a new directory called train_annot and save it there. Close boxmanager.
2. Start crYOLO
You can use crYOLO either by command line or by using the GUI. The GUI should be easier for most users. You can start it with:
cryolo_gui.py
The crYOLO GUI is essentially a visualization of the command line interface. On left side, you find all possible “Actions”:
config: With this action you create the configuration file that you need to run crYOLO.
train: This action lets you train crYOLO from scratch or refine an existing model.
predict: If you have a (pre)trained model you can pick particles in your data set using this command.
evaluation: This action helps you to quantify the quality of your model.
boxmanager: This action starts the cryolo boxmanager. You can visualize the picked particles with it or create training data.
Each action has several parameters which are organized in tabs. Once you have chosen your settings you can press Start (just as example, don’t press it now ;-)), the command will be applied and crYOLO shows you the output:
It will tell you if something went wrong. Moreover, it will tell you all parameters used. Pressing Back brings you back to your settings, where you can either edit the settings (in case something went wrong) or go to the next action.
3. Configuration
Choose the action config. The configuration is basically the same as for picking particles from scratch. Set the boxsize to the value you’ve choosen when creating the training data. Set folder where your tomogram is as train_image_folder and the CBOX folder that you created in step 2 as train_annot_folder.
If you binned (4x/8x) the tomograms, please choose a lower absolute threshold for the low pass filter. In the tab Denoising options you need to set low_pass_cutoff to e.g 0.3 or 0.4.
Press Start to create the configuration file.
4. Training
Now you are ready to train the model. In case you have multiple GPUs, you should first select a free GPU. The following command will show the status of all GPUs:
nvidia-smi
For this tutorial, we assume that you have either a single GPU or want to use GPU 0.
Use a different or multiple GPUs
In the Optional arguments tab you can change the GPU that should be used by crYOLO. If you have multiple GPUs (e.g. nvidia-smi lists GPU 0 and GPU 1) you can also use both by setting the GPU argument to ‘0 1’.
In the GUI you have to fill in the mandatory fields:
The default number of warmup epochs is fine as long as you don’t want to refine an existing model. During the warmup training epochs it will not try to estimate the size of your particle, which helps crYOLO to converge.
When does crYOLO stop the training?
When you start the training, it will stop when the “loss” metric on the validation data does not improve 10 times in a row. This is typically enough. In case you want to give the training more time to find the best model you can increase the “not changed in a row” parameter to a higher value by setting the early argument in the Optional arguments to, for example, 15.
The final model will be written to disk as specified in saved_weights_name in your configuration file.
Now press the Start button to start the training on the local machine or the Submit button to submit the job to a queueing system
Hint
Alternative: Train crYOLO using the command line
To run the training on GPU 0 with 5 warmup-epochs and an early stop of 15 navigate to the folder with config_cryolo.json file, train_image folder etc.
cryolo_train.py -c config_cryolo.json -w 5 -g 0 -e 15
The final model file will be written to disk.
5. Prediction
Select the action predict and fill in the data for the Required arguments tab. Next select the Tomography options tab. Activate the checkbox Activate tomograghy picking mode. Keep the other values default. See the info box about information about the tomography picking mode.
Note
Tomography picking
When using the tomography picking mode, crYOLO will first pick your target structure on each slice separately and then trace it through the volume. There are three parameters that be used to adjust this tracing: tracing_search_range, tracing_memory and tracing_min_length. However, you can safely use the default values. Only change the parameters if you encounter problems.
Two picked boxes in separate slices are considered to belong to the same particle when they are within the tracing_search_range and the gab between the two slices is not bigger than the value configured in tracing_memory. Traces that contain less boxes then the the value configured in tracing_min_length are considered as false positive and are removed.
Now you can press Start.
crYOLO will write four folders into the output directory. CBOX_3D, CBOX_UNTRACED, EMAN_3D and coords.
The folder CBOX_3D contains 3D boxes in the CBOX format. The folder CBOX_UNTRACED
contains the picks for each slices that were used for tracing. Ignore it for now, it will be relevant
in a later boxmanager version. The folder EMAN_3D contains the coordinates of 3d boxes in EMAN2 format.
The files in coords contain files that can directly used in IMOD.
6. Visualization
You can visualize the 3D boxes using the napari boxmanager. The command is:
napari_boxmanager /path/to/your/tomogram.mrc path/to/CBOX_3D/tomogram.cbox
Tutorial 6: Pick filaments in tomograms
This tutorial explains how to pick filaments in a tomogram. Therefore you need to label a couple of slices manually and train cryolo.
If you followed the installation instructions, you now have to activate the cryolo virtual environment with
source activate cryolo
1. Data preparation
In the following I will assume that your tomo data is in the folder images.
The next step is to create training data. To do so, we have to pick a few slices manually of your tomogram. Ideally, each slices is picked to completion. However, it is not necessary to pick all particles. crYOLO will still converge if you miss some (or even many). If you want to reach generalization across multiple tomograms, we recommend to include multiple tomograms in your tomogram.
How many slices have to be picked?
It depends! Typically 10 slices are a good start. However, that number may increase / decrease due to several factors:
A very heterogeneous tomogram could make it necessary to pick more slices.
When you refine a general model, you might need to pick fewer images.
If your slices are only sparsely decorated, you may need to pick more images.
We recommend that you start with 10 slices, then autopick your data, check the results and finally decide whether to add more slices to your training set.
To create your training data, we developed a dedicated napari plugin called “napari-boxmanager”.
Start the box manager with the following command:
napari_boxmanager
For opening your tomograms you have two options:
Single tomogram: Press File -> Open File(s)… and the select one file from the
imagesdirectory.Folder: Press File -> Open Folder… and the select the
imagesdirectory.
Increase the contrast
You might want to run a low pass filter before you start picking to get better contrast.
Switch to tab bandpass_filter and check if the default LP resolution is ok and that the extracted Pixel size is correct.
Press Run to get a new layer with your low pass filtered images. It will filter the images on-the-fly.
How to pick filaments:
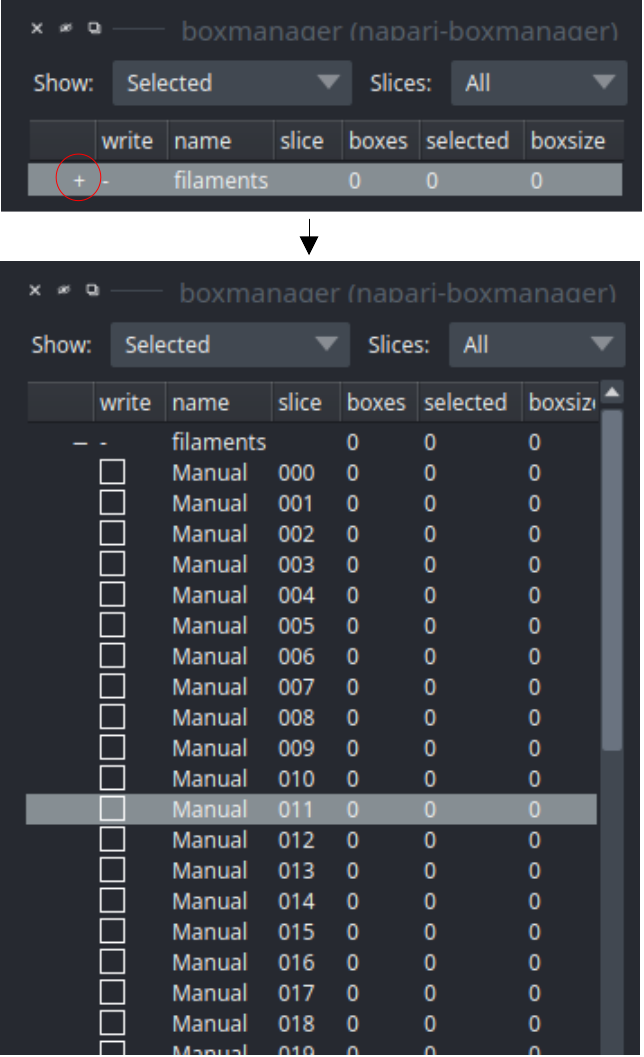
First you need to create a new layer for picking filaments. Switch to the tab Organize_layer and click Create filament layer. I assume that you only have one image stack open, in case you don’t please adapt Target image layer accordingly. Switch to the boxmanager tab. Open the list of coordinates by pressing the little +.
The filaments are placed as follows:
Place a filament: Switch to layer control to
. Click with LMB at the start of the filament. You can click along the filament. Double click to end the picking of filament.Remove filament: Switch to layer control to
(shortcut key 5). Click on your filament and press DEL.
You can change the box width in the main window, by changing the number in the text field boxsize. Press Enter to apply it to all picked filaments. For training crYOLO, you should the use a box width ~2x bigger than your filament width.
If you have images that do not contain filaments but only contamination / ice you can add them to your training set by activate the checkbox in front of the image.
Label your filaments in some slices ideally on multiple tomograms. Label them even if the slices do not show the centre of the filaments but only parts of it.
Save your training data
If you finished picking, you can export your box files in the tab organize_layer. You can keep the default values. Press Save to dir, create a folder boxes and save your box files into it.
In the folder boxes you just created, you will find three subdirectories CBOX_FILAMENT. One file for each tomogram. Each file contains filament coordinates segmented (according inter-box distance) into several boxes.
Create a new folder called train_annot and copy the files from CBOX_FILAMENT into this folder. Alternatively you can also directly specify the CBOX_FILAMENT folder during the configuration step.
2. Start crYOLO
You can use crYOLO either by command line or by using the GUI. The GUI should be easier for most users. You can start it with:
cryolo_gui.py
The crYOLO GUI is essentially a visualization of the command line interface. On left side, you find all possible “Actions”:
config: With this action you create the configuration file that you need to run crYOLO.
train: This action lets you train crYOLO from scratch or refine an existing model.
predict: If you have a (pre)trained model you can pick particles in your data set using this command.
evaluation: This action helps you to quantify the quality of your model.
boxmanager: This action starts the cryolo boxmanager. You can visualize the picked particles with it or create training data.
Each action has several parameters which are organized in tabs. Once you have chosen your settings you can press Start (just as example, don’t press it now ;-)), the command will be applied and crYOLO shows you the output:
It will tell you if something went wrong. Moreover, it will tell you all parameters used. Pressing Back brings you back to your settings, where you can either edit the settings (in case something went wrong) or go to the next action.
3. Configuration
Choose the action config. The configuration is basically the same as for picking particles from scratch. Set the boxsize to the value you’ve choosen when creating the training data. Choose the folder where your tomogram is as train_image_folder and the CBOX folder that you created in step 2 as train_annot_folder.
If you binned (4x/8x) the tomograms, please choose a lower absolute threshold for the low pass filter. In the tab Denoising options you need to set low_pass_cutoff to e.g 0.3 or 0.4.
Press Start to create the configuration file.
4. Training
Now you are ready to train the model. In case you have multiple GPUs, you should first select a free GPU. The following command will show the status of all GPUs:
nvidia-smi
For this tutorial, we assume that you have either a single GPU or want to use GPU 0.
Use a different or multiple GPUs
In the Optional arguments tab you can change the GPU that should be used by crYOLO. If you have multiple GPUs (e.g. nvidia-smi lists GPU 0 and GPU 1) you can also use both by setting the GPU argument to ‘0 1’.
In the GUI you have to fill in the mandatory fields:
The default number of warmup epochs is fine as long as you don’t want to refine an existing model. During the warmup training epochs it will not try to estimate the size of your particle, which helps crYOLO to converge.
When does crYOLO stop the training?
When you start the training, it will stop when the “loss” metric on the validation data does not improve 10 times in a row. This is typically enough. In case you want to give the training more time to find the best model you can increase the “not changed in a row” parameter to a higher value by setting the early argument in the Optional arguments to, for example, 15.
For learning the directions of the filaments and in general the filament mode needs more time compared to single particles. Therefore we recommend to set the early argument in the Optional arguments to 15.
The final model will be written to disk as specified in saved_weights_name in your configuration file.
Now press the Start button to start the training on the local machine or the Submit button to submit the job to a queueing system
Hint
Alternative: Train crYOLO using the command line
To run the training on GPU 0 with 5 warmup-epochs and an early stop of 15 navigate to the folder with config_cryolo.json file, train_image folder etc.
cryolo_train.py -c config_cryolo.json -w 5 -g 0 -e 15
The final model file will be written to disk.
5. Prediction
Choose the action predict. You now need to make changes in three tabs:
In the Required arguments tabs you need to choose your configuration file from step 2 in field conf. For the field weights you choose the .h5 that you got after step 5. In input you choose the folder which contain the tomograms you want to pick.
In the Filament options you simply need to activate the checkbox filament. The default parameters for the other options should be ok for most cases.
directional_method
To trace the filaments in 2D, the local direction of the filament has to be estimated. There are two methods available:
With PREDICTED you use the predicted direction learned by crYOLO. This is the recommended method.
With CONVOLUTION an elliposid mask with the width given by filament_width is rotated and convolved with the input image. The direction with the highest response gives the local direction of the filament. This method is mainly for backwards compatibility with earlier crYOLO versions (< 1.8).
In the Tomography options tab also simply activate the checkbox tomogram. The default parameters for the other options should be ok for most cases.
3D Filament tracing
To trace your filaments in 3D, the filaments are first traced slicewise and then grouped together across slices using graphs. The connected components in that graph are groups of 2D filaments that represent a single 3D filament. Those 2D filaments are then averages to create a 3D filament.
Now press the Start button to start the pick your tomogram. The output will be various folders:
CBOX_FILAMENTS_TRACED: Filaments traced in 3D.CBOX_FILAMENTS_UNTRACED: Filaments traced in 2D but not in 3D. This is the internal input for 3D tracing and mainly for troubleshooting.CBOX: Particles picked by crYOLO. This is the input for the 2D filament tracing and mainly for troubleshooting (see section 8).COORDS_TRACED: 3D filament coordinates as they are needed for visualization in imod.COORDS_TRACED_FID: Same asCOORDS_TRACEDbut with a additional column for filament width. Those files are only an intermediate solution and will be replaced in a future version.DISTR: Contains size distribution information. Not informative in this case. Only helpful with a general model, which does not yet exist for filaments.
Hint
Evaluate directional estimates
You can check how well crYOLO did in estimating the directionality, which is crucial for the subsequent filament tracing. To do this for a given threshold (e.g. 0.3), you can run
cryolo_boxmanager_tools.py cbox_directions -m full_data/tomo.mrc -c output_boxes/CBOX/tomo.cbox -t 0.3 -o output_boxes/directions/
You will find a tiff stack in output_boxes/directions/ after the script has finished. Open it for example with ImageJ.
6. Visualize the results
You can open all files (except COORDS_TRACED and DISTR) within the cryolo boxmanager. Just type e.g.
napari_boxmanager path/to/tomogram.mrc out/CBOX/CBOX_FILAMENTS_TRACED/tomogram.cbox
to start the boxamanger.
7. Extraction
Once you are happy with the results, you need to prepare everything for further processing
Option 1: Use the files from COORDS_TRACED as inputs for relion particle extraction
RELION sub-volume averaging requires a certain file structure in the project directory, for example:
~/RelionProjectDir/Tomograms/tomogram1/tomogram1.mrc
~/RelionProjectDir/Tomograms/tomogram1/tomogram1.mrcs (aligned stack)
~/RelionProjectDir/Tomograms/tomogram1/tomogram1.order
~/RelionProjectDir/Tomograms/tomogram1/tomogram1.tlt
~/RelionProjectDir/Tomograms/tomogram1/tomogram1.coords
The tomogram1.coords file requires the 3D coordinates per tomogram of your particle positions. The files from COORDS_TRACED can be used directly at this point.
However, the files need to get rescaled in case binned tomograms were used for picking. Lets assume you picked on 4x binned tomograms. Then you can rescale the .coords files with:
cryolo_boxmanager_tools.py scale -i /path/to/COORDS_TRACED -o /path/to/COORDS_TRACED_RESCALED -s 4.0
The rescaled .coords files can then be used for sub-volume averaging.
In order to incorporate priors from the filament data into the star file using this strategy, this information needs to be extracted from the COORDS_TRACED_FID files and added to the particles.star output from the extraction job in RELION. The following command generates an augmented .star file based on the RELION-generated particle.star file:
cryolo_boxmanager_tools.py priors2star -i particles.star -fi /path/to/COORDS_TRACED_FID -o .
This command will add extract the filament information from the files in COORDS_TRACED_FID and add them to the information from the particles.star file and write the augmented file particles_with_priors.star (with the additional columns _rlnHelicalTubeID, _rlnAngleTiltPrior _rlnAnglePsiPrior) to disk. This can then be used for subsequent subtomogram averaging with helical options.
Warning
File name convention
In order to match the right files in COORDS_TRACED_FID to the tomograms specified in you particles.star it is necessary that the tomogram filename (without extension) is contained in the filename of COORDS_TRACED_FID
Option 2: Convert the files from COORDS_TRACED_FID into star for input into Warp
If using tomograms produced by Warp to pick particles using cryolo, one can use the particle coordinates to produce a star file that is compatible with the particle extraction functionality within Warp.
cryolo_boxmanager_tools.py coords2star -i /path/to/COORDS_TRACED_FID/ -o out_warp/ --scale 1.0 --apix PIXEL_SIZE --mag 10000
Dependent of your binning and microscope settings, you need to adapt the scale (--scale), pixelsize (--apix) and magnification (--mag). You will find the Warp compatible star file in out_warp.
8. Troubleshooting
What to do when the 3D tracing didnt produced good results? Many filaments were not traced at all? Here we give some recommendations what to do.
- Check the particles picked by crYOLO by loading the folder
CBOXin the boxmanager. You should see multiple particles picked on every filament. If not, do they appear when you lower the confidence threshold?
In case this doesnt help you should add more training data. Especially those slices where crYOLO missed a lot of particles of picked in the background. Then you retrain and start the prediction again.
(Coming soon with a boxmanager update) Check if the directional estimations are pointing in along the filament.
- Check the particles picked by crYOLO by loading the folder
- Check the filament tracing: Open the
CBOX_FILAMENTS_UNTRACEDfolder in the boxmanager. You should see you filaments traced. If not, have you checked if the directional estimations in step 1? In case they were not accurate, you might want to try to retrain your model again, but this time, give the your training a little bit more time by setting the early argument within the train action in the Optional arguments to, for example, 20. It also helps if you add more training data.
If you observed that boxes within one filament in step 1 were not overlapping, you can try to increase the search range. Open the action predict, open the Filament options tab and increase the search_range_factor from 1.41 to, for example, 2.
- Check the filament tracing: Open the
- Everything from the above to steps looks fine? Maybe you need to adjust the 3D tracing settings:
Are your filaments very tilted in your dataset? It might help to decrease the tracing_min_edge_weight within the Tomography options of the action Predict
If your filaments where nicely traced in 2D but many are missing in 3D it might be that multiple separate filaments where merged into one filament. This leads to effect that the averages filament is somewhere in the tomogram, but is not following any filament. One option to resolve this issue is to increase the tracing_min_edge_weight.
Nothing helped? Find help at our mailing list!